Django rest framework如何自定义用户表
- 作者: 精中罩38C
- 来源: 51数据库
- 2021-07-08
说明
django 默认的用户表 auth_user 包含 id, password, last_login, is_superuser, username, last_name, email, is_staff, is_active, date_joined, first_name 字段。这些基本字段不够用时,在此基本表上拓展字段是很好选择。本文介绍在 drf(django rest framework) 上使用自定义用户表进行接口访问控制的功能设计。
1. django项目和应用创建
先装必要的模块
pip install django
pip install djangorestframework
创建项目文件夹、项目和应用
e:\sweetyaya> mkdir myproj01
e:\sweetyaya> cd myproj01
e:\sweetyaya\myproj01> django-admin startproject myproj01 .
e:\sweetyaya\myproj01> django-admin startapp myapp
同步数据库
e:\sweetyaya\myproj01> python manage.py migrate
operations to perform:
  apply all migrations: admin, auth, contenttypes, sessions
running migrations:
  applying contenttypes.0001_initial... ok
  applying auth.0001_initial... ok
  applying admin.0001_initial... ok
  applying admin.0002_logentry_remove_auto_add... ok
  ...
  applying sessions.0001_initial... ok
执行如下命令后测试访问 http://127.0.0.1:8000/
e:\sweetyaya\myproj01>python manage.py runserver
watching for file changes with statreloader
performing system checks...

system check identified no issues (0 silenced).
june 07, 2021 - 21:16:57
django version 3.2.4, using settings 'myproj01.settings'
starting development server at http://127.0.0.1:8000/
quit the server with ctrl-break.
2. 自定义user表
打开 myapp/models.py 文件,创建继承自 abstractuser 的 userprofile 类,给它添加 name 和 mobile 字段,它就是我们自定义的用户表。
from django.db import models
from django.contrib.auth.models import abstractuser


class userprofile(abstractuser):
    name = models.charfield(max_length=30, null=true, blank=true, verbose_name="姓名")
    mobile = models.charfield(max_length=11, verbose_name="电话")

    class meta:
        verbose_name = "用户"
        verbose_name_plural = "用户"

        def __str__(self):
            return self.name
3. 序列化和路由
我们直接在 myproj01/url.py 中进行定义序列化方法和路由配置
from django.urls import path, include
from myapp.models import userprofile
from rest_framework import routers, serializers, viewsets


# serializers define the api representation.
class userserializer(serializers.hyperlinkedmodelserializer):
    class meta:
        model = userprofile
        fields = ['url', 'username', 'name', 'mobile', 'email', 'is_staff']


# viewsets define the view behavior.
class userviewset(viewsets.modelviewset):
    queryset = userprofile.objects.all()
    serializer_class = userserializer


# routers provide an easy way of automatically determining the url conf.
router = routers.defaultrouter()
router.register('users', userviewset)

# wire up our api using automatic url routing.
# additionally, we include login urls for the browsable api.
urlpatterns = [
    path('', include(router.urls)),
    path('api-auth/', include('rest_framework.urls', namespace='rest_framework'))
]
3. drf配置
找到 myproj01/settings.py ,做如下配置
加入上面创建的应用和 rest_framework
installed_apps = [
    'django.contrib.admin',
	...
    'rest_framework',
    'myapp',
]
添加全局认证设置
rest_framework = {
    'default_permission_classes': [
        'rest_framework.permissions.isauthenticated'
    ]
}
修改默认用户表,至此 settings.py 全部配置完成了。
auth_user_model = 'myapp.userprofile'
4. 同步数据库
执行 makemigrations 命令
e:\sweetyaya\myproj01> python manage.py makemigrations
migrations for 'myapp':
  myapp\migrations\0001_initial.py
    - create model userprofile
执行 migrate 命令出现如下错误
e:\sweetyaya\myproj01> python manage.py migrate
traceback (most recent call last):
  file "manage.py", line 22, in <module>
    main()
  file "manage.py", line 18, in main
    execute_from_command_line(sys.argv)
  file "d:\program files\python36\lib\site-packages\django\core\management\__init__.py", line 419, in execute_from_command_line
    utility.execute()
  file "d:\program files\python36\lib\site-packages\django\core\management\__init__.py", line 413, in execute
    self.fetch_command(subcommand).run_from_argv(self.argv)
  file "d:\program files\python36\lib\site-packages\django\core\management\base.py", line 354, in run_from_argv
    self.execute(*args, **cmd_options)
  file "d:\program files\python36\lib\site-packages\django\core\management\base.py", line 398, in execute
    output = self.handle(*args, **options)
  file "d:\program files\python36\lib\site-packages\django\core\management\base.py", line 89, in wrapped
    res = handle_func(*args, **kwargs)
  file "d:\program files\python36\lib\site-packages\django\core\management\commands\migrate.py", line 95, in handle
    executor.loader.check_consistent_history(connection)
  file "d:\program files\python36\lib\site-packages\django\db\migrations\loader.py", line 310, in check_consistent_history
    connection.alias,
django.db.migrations.exceptions.inconsistentmigrationhistory: migration admin.0001_initial is applied before its dependency myapp.0001_initial on database 'default'.
解决办法
先 makemigrations打开 settings.py ,注释掉 install_apps 中的
'django.contrib.admin',打开 urls.py ,注释掉 urlpatterns 中的 admin,再 migrate 就不报错了。最后注意把注释内容恢复回来就好了。
e:\sweetyaya\myproj01> python manage.py migrate
operations to perform:
  apply all migrations: myapp, admin, auth, contenttypes, sessions
running migrations:
  applying contenttypes.0001_initial... ok
  applying contenttypes.0002_remove_content_type_name... ok
  ...
  applying admin.0003_logentry_add_action_flag_choices... ok
  applying sessions.0001_initial... ok
5. 测试
执行命令
e:\sweetyaya\myproj01>python manage.py runserver
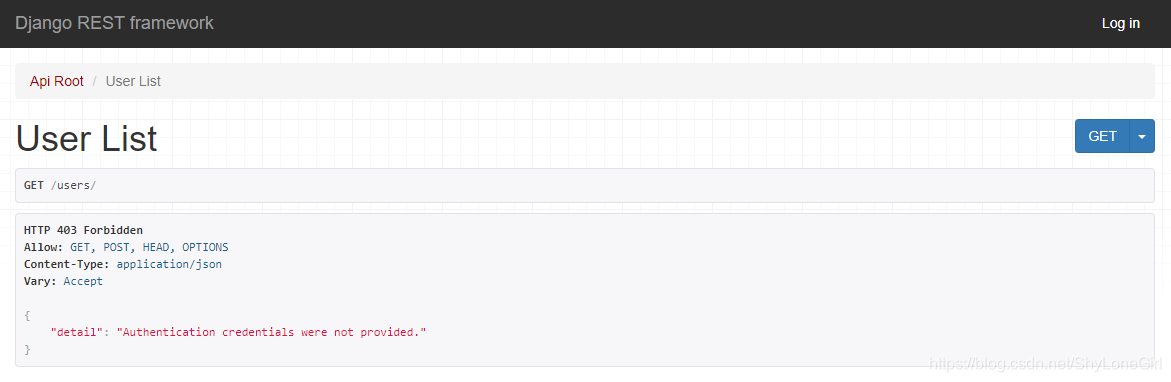
访问 http://127.0.0.1:8000/users/ 出现结果如下,此时表明配置成功,但是尚未进行用户登录无权访问。
6. 命令行注册用户
进入 python shell
e:\sweetyaya\myproj01> python manage.py shell
python 3.6.6 (v3.6.6:4cf1f54eb7, jun 27 2018, 03:37:03) [msc v.1900 64 bit (amd64)]
type 'copyright', 'credits' or 'license' for more information
ipython 6.5.0 -- an enhanced interactive python. type '?' for help.
键入如下代码
in [1]: from myapp.models import userprofile

in [2]: from django.contrib.auth.hashers import make_password

in [3]: ist = userprofile(username='guest01',password=make_password('123456'))

in [4]: ist.save()

in [5]: ist = userprofile(username='guest02',password=make_password('123456'))

in [6]: ist.save()
然后在数据库中查看 myapp_userprofile 表发现多了两条记录,添加成功,继续访问 http://127.0.0.1:8000/users/ 地址,使用用户密码登录可见如下。测试完成。

到此这篇关于django rest framework如何自定义用户表的文章就介绍到这了,更多相关django rest framework自定义用户表内容请搜索以前的文章或继续浏览下面的相关文章希望大家以后多多支持!