electron实现静默打印的示例代码
- 作者: 37男生37204091
- 来源: 51数据库
- 2021-08-05
前言
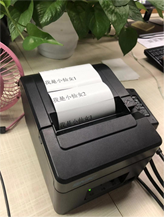
electron+vuecli3 实现设置打印机,静默打印小票功能
网上相关的资料比较少,这里给大家分享一下,希望大家可以少踩一些坑
必须要强调一下的是electron的版本必须是3.0.0不能,我尝试了4和5都没有实现
效果图
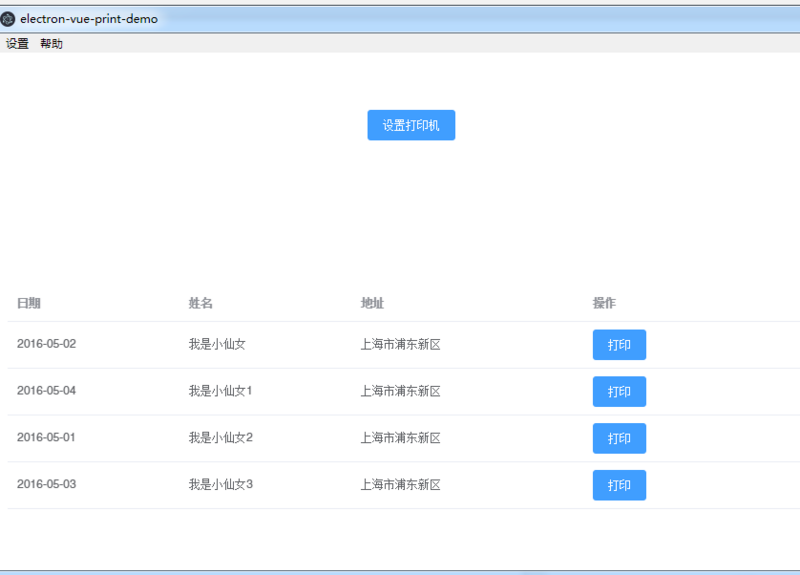
使用
git clone http://www.51sjk.com/Upload/Articles/1/0/284/284081_20210710003425860.git
npm install
npm run electron:serve
实现
操作思路
1.用户点击打印
2.查询本地electron-store(用来向本地存储,读取数据)是否存打印机名称
3.已经设置,直接打印
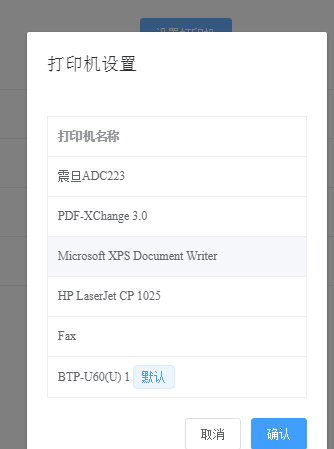
4.没有设置,弹出设置打印机框
5.用户设置好确认后打印
首页app.vue引入了两个组件,一个是主动设置打印机的弹出printdialog
另外一个是打印组件,打印是通过webview将需要打印的内容渲染到html页面然后就能打印了
<template>
 <div id="app">
  <el-button type="primary" @click="showprint">设置打印机</el-button>
  <printdialog :dialog-visible="dialogvisible" @cancel="handleprintdialogcancel" />
  <pinter ref="print" :html-data="htmldata"></pinter>
  <el-table :data="tabledata" style="width: 100%">
   <el-table-column prop="date" label="日期" width="180" column-key="date">
   </el-table-column>
   <el-table-column prop="name" label="姓名" width="180">
   </el-table-column>
   <el-table-column prop="address" label="地址">
   </el-table-column>
   <el-table-column label="操作">
    <template slot-scope="scope">
     <el-button type="primary" @click="doprint(scope.row)">打印</el-button>
    </template>
   </el-table-column>
  </el-table>
 </div>
</template>
<script>
import { ipcrenderer } from 'electron'
import printdialog from './components/printdialog.vue'
import pinter from './components/pinter.vue'
export default {
 name: 'app',
 components: {
  pinter,
  printdialog
 },
 data() {
  return {
   dialogvisible: false,
   htmldata: '',
   printlist: [],
   tabledata: [{
    date: '2016-05-02',
    name: '我是小仙女',
    address: '上海市浦东新区',
    tag: '家'
   }, {
    date: '2016-05-04',
    name: '我是小仙女1',
    address: '上海市浦东新区',
    tag: '公司'
   }, {
    date: '2016-05-01',
    name: '我是小仙女2',
    address: '上海市浦东新区',
    tag: '家'
   }, {
    date: '2016-05-03',
    name: '我是小仙女3',
    address: '上海市浦东新区',
    tag: '公司'
   }]
  }
 },
 mounted() {
 },
 methods: {
  showprint() {
   this.dialogvisible = true
  },
  handleprintdialogcancel() {
   this.dialogvisible = false
  },
  doprint(row) {
   this.htmldata = row.name
   this.$refs.print.print(row.name)
  }
 }
}
</script>

<style>
#app {
 font-family: 'avenir', helvetica, arial, sans-serif;
 -webkit-font-smoothing: antialiased;
 -moz-osx-font-smoothing: grayscale;
 text-align: center;
 color: #2c3e50;
 margin-top: 60px;
}
</style>
app.vue 每次点击打印按钮后触发组件的print方法并将数据传过去 this.$refs.print.print(row.name)
printer.vue 查询打印机,然后调用打印方法printrender。
<template>
 <div class="container">
  <webview id="printwebview" ref="printwebview" :src="fullpath" nodeintegration />
  <printdialog :dialog-visible="dialogvisible" @cancel="handleprintdialogcancel" @select-print="printselectafter" />
 </div>
</template>
<script>
import { ipcrenderer } from 'electron'
import path from 'path'
import printdialog from './printdialog.vue'
export default {
 name: 'pinter',
 components: {
  printdialog
 },
 props: {
  // htmldata: {
  //  type: string,
  //  default: '',
  // },
 },
 data() {
  return {
   printlist: [],
   dialogvisible: false,
   printdevicename: '',
   fullpath: path.join(__static, 'print.html'),
   messagebox: null,
   htmldata: ''
  }
 },

 mounted() {
  const webview = this.$refs.printwebview
  webview.addeventlistener('ipc-message', (event) => {
   if (event.channel === 'webview-print-do') {
    console.log(this.printdevicename)
    webview.print(
     {
      silent: true,
      printbackground: true,
      devicename: this.printdevicename
     },
     (data) => {
      this.messagebox.close()
      if (data) {
       this.$emit('complete')
      } else {
       this.$emit('cancel')
      }
     },
    )
   }
  })
 },
 methods: {
  print(val) {
   this.htmldata = val
   this.getprintlisthandle()
  },
  // 获取打印机列表
  getprintlisthandle() {
   // 改用ipc异步方式获取列表,解决打印列数量多的时候导致卡死的问题
   ipcrenderer.send('getprinterlist')
   ipcrenderer.once('getprinterlist', (event, data) => {
    // 过滤可用打印机
    this.printlist = data.filter(element => element.status === 0)
    // 1.判断是否有打印服务
    if (this.printlist.length <= 0) {
     this.$message({
      message: '打印服务异常,请尝试重启电脑',
      type: 'error'
     })
     this.$emit('cancel')
    } else {
     this.checkprinter()
    }
   })
  },
  // 2.判断打印机状态
  checkprinter() {
   // 本地获取打印机
   const printername = this.$electronstore.get('printform') || ''
   const printer = this.printlist.find(device => device.name === printername)
   // 有打印机设备并且状态正常直接打印
   if (printer && printer.status === 0) {
    this.printdevicename = printername
    this.printrender()
   } else if (printername === '') {
    this.$message({
     message: '请先设置其他打印机',
     type: 'error',
     duration: 1000,
     onclose: () => {
      this.dialogvisible = true
     }
    })
    this.$emit('cancel')
   } else {
    this.$message({
     message: '当前打印机不可用,请重新设置',
     type: 'error',
     duration: 1000,
     onclose: () => {
      this.dialogvisible = true
     }
    })

   }
  },

  handleprintdialogcancel() {
   this.$emit('cancel')
   this.dialogvisible = false
  },
  printselectafter(val) {
   this.dialogvisible = false
   this.$electronstore.set('printform', val.name)
   this.printdevicename = val.name
   this.printrender()
  },
  printrender(html) {
   this.messagebox = this.$message({
    message: '打印中,请稍后',
    duration: 0
   })
   // 获取<webview>节点
   const webview = this.$refs.printwebview
   // 发送信息到<webview>里的页面
   webview.send('webview-print-render', {
    printname: this.printdevicename,
    html: this.htmldata
   })
  }
 }
}
</script>
<style scoped>
.container {
 position: fixed;
 right: -500px;
}
</style>
public/print.html渲染webview页面成功后发送打印指令
 <script>
  const { ipcrenderer } = require('electron')
  ipcrenderer.on('webview-print-render', (event, info) => {
   // 执行渲染
   document.getelementbyid('bd').innerhtml = info.html
   ipcrenderer.sendtohost('webview-print-do')
  })
 </script>
这里用到了electron-store存取本地数据
background.js 引入 初始化挂载在global
import electronstore from 'electron-store'
// electronstore 默认数据
import electrondefaultdata from './config/electron-default-data'
let electronstore
app.on('ready', async() => {
 // 初始化配置文件
 electronstore = new electronstore({
  defaults: electrondefaultdata,
  cwd: app.getpath('userdata')
 })
 global.electronstore = electronstore
})
src/plugins/inject.js
注册$electronstore
// eslint-disable-next-line
import { remote } from 'electron'
export default {
 /* eslint no-param-reassign: "error" */
 install(vue) {
  vue.prototype.$electronstore = remote.getglobal('electronstore')

 }
}
然后你就可以在vue文件里读取了
this.$electronstore.get('printform') 和 this.$electronstore.set('printform', val.name)
以上就是本文的全部内容,希望对大家的学习有所帮助,也希望大家多多支持。
推荐阅读