vue中使用protobuf的过程记录
- 作者: 灬跪求粉色木耳灬
- 来源: 51数据库
- 2021-10-03
由于目前公司采用了protobuf做前后端数据交互,进公司以来一直用的是公司大神写好的基础库,完全不了解底层是如何解析的,一旦报错只能求人,作为一只还算有钻研精神的猿,应该去了解一下底层的实现,在这里记录一下学习过程。
protobuf简单介绍
google protocol buffer(简称 protobuf)是一种轻便高效的结构化数据存储格式,平台无关、语言无关、可扩展,可用于通讯协议和数据存储等领域。
有几个优点:
1.平台无关,语言无关,可扩展;
2.提供了友好的动态库,使用简单;
3.解析速度快,比对应的xml快约20-100倍;
4.序列化数据非常简洁、紧凑,与xml相比,其序列化之后的数据量约为1/3到1/10。
个人感受: 前后端数据传输用json还是protobuf其实对开发来说没啥区别,protobuf最后还是要解析成json才能用。个人觉得比较好的几点是:
1.前后端都可以直接在项目中使用protobuf,不用再额外去定义model;
2.protobuf可以直接作为前后端数据和接口的文档,大大减少了沟通成本;
没有使用protobuf之前,后端语言定义的接口和字段,前端是不能直接使用的,前后端沟通往往需要维护一份接口文档,如果后端字段有改动,需要去修改文档并通知前端,有时候文档更新不及时或容易遗漏,沟通成本比较大。 使用protobuf后,protobuf文件由后端统一定义, protobuf直接可以作为文档 ,前端只需将protobuf文件拷贝进前端项目即可。如果后端字段有改动,只需通知前端更新protobuf文件即可,因为后端是直接使用了protobuf文件,因此protobuf文件一般是不会出现遗漏或错误的。长此以往,团队合作效率提升是明显的。
废话了一大堆,下面进入正题。 我这里讲的主要是在vue中的使用,是目前本人所在的公司项目实践,大家可以当做参考。
思路
前端中需要使用 protobuf.js 这个库来处理proto文件。
protobuf.js 提供了几种方式来处理proto。
protobuf.load("awesome.proto", function(err, root) {...})
protobuf.load("awesome.json", function(err, root) {...})
众所周知,vue项目build后生成的dist目录中只有html,css,js,images等资源,并不会有 .proto 文件的存在,因此需要用 protobuf.js 这个库将 *.proto 处理成 *.js 或 *.json ,然后再利用库提供的方法来解析数据,最后得到数据对象。
ps: 实践发现,转化为js文件会更好用一些,转化后的js文件直接在原型链上定义了一些方法,非常方便。因此后面将会是使用这种方法来解析proto。
预期目标
在项目中封装一个 request.js 模块,希望能像下面这样使用,调用api时只需指定请求和响应的model,然后传递请求参数,不需关心底层是如何解析proto的,api返回一个promise对象:
// /api/student.js 定义接口的文件
import request from '@/lib/request'

// params是object类型的请求参数
// school.pbstudentlistreq 是定义好的请求体model
// school.pbstudentlistrsp 是定义好的响应model
// getstudentlist 是接口名称
export function getstudentlist (params) {
 const req = request.create('school.pbstudentlistreq', params)
 return request('getstudentlist', req, 'school.pbstudentlistrsp')
}

// 在helloworld.vue中使用
import { getstudentlist } from '@/api/student'
export default {
 name: 'helloworld',
 created () {

 },
 methods: {
 _getstudentlist () {
  const req = {
  limit = 20,
  offset = 0
  }
  getstudentlist(req).then((res) => {
  console.log(res)
  }).catch((res) => {
  console.error(res)
  })
 }
 }
}
准备工作
1.拿到一份定义好的proto文件。
虽然语法简单,但其实前端不用怎么关心如何写proto文件,一般都是由后端来定义和维护。在这里大家可以直接用一下我定义好的一份 demo 。
// user.proto
package framework;
syntax = "proto3";

message pbuser {
 uint64 user_id = 0;
 string name = 1;
 string mobile = 2;
}

// class.proto
package school;
syntax = "proto3";

message pbclass {
 uint64 classid = 0;
 string name = 1;
}

// student.proto
package school;
syntax = "proto3";

import "user.proto";
import "class.proto";

message pbstudent {
 uint64 studentid = 0;
 pbuser user = 1;
 pbclass class = 2;
 pbstudentdegree degree = 3;
}

enum pbstudentdegree {
 primary = 0; // 小学生
 middle = 1; // 中学生
 senior = 2; // 高中生
 college = 3; // 大学生
}

message pbstudentlistreq {
 uint32 offset = 1;
 uint32 limit = 2;
}

message pbstudentlistrsp {
 repeated pbstudent list = 1;
}


// messagetype.proto
package framework;
syntax = "proto3";
// 公共请求体
message pbmessagerequest {
 uint32 type = 1;       // 消息类型
 bytes messagedata = 2;      // 请求数据
 uint64 timestamp = 3;      // 客户端时间戳
 string version = 4;       // api版本号

 string token = 14;       // 用户登录后服务器返回的 token,用于登录校验
}

// 消息响应包
message pbmessageresponse {
 uint32 type = 3;       // 消息类型
 bytes messagedata = 4;      // 返回数据

 uint32 resultcode = 6;      // 返回的结果码
 string resultinfo = 7;      // 返回的结果消息提示文本(用于错误提示)
}
// 所有的接口
enum pbmessagetype {
 // 学生相关
 getstudentlist = 0;       // 获取所有学生的列表, pbstudentlistreq => pbstudentlistrsp
}
其实不用去学习proto的语法都能一目了然。这里有两种命名空间 framework 和 school , pbstudent 引用了 pbuser ,可以认为 pbstudent 继承了 pbuser 。
一般来说,前后端需要统一约束一个请求model和响应model,比如请求中哪些字段是必须的,返回体中又有哪些字段,这里用 messagetype.proto 的 pbmessagerequest 来定义请求体所需字段, pbmessageresponse 定义为返回体的字段。
pbmessagetype 是接口的枚举,后端所有的接口都写在这里,用注释表示具体请求参数和返回参数类型。比如这里只定义了一个接口 getstudentlist 。
拿到后端提供的这份 *.proto 文件后,是不是已经可以基本了解到:有一个 getstudentlist 的接口,请求参数是 pbstudentlistreq ,返回的参数是 pbstudentlistrsp 。
所以说proto文件可以直接作为前后端沟通的文档。
步骤
1.新建一个vue项目
同时添加安装 axios 和 protobufjs 。
# vue create vue-protobuf
# npm install axios protobufjs --save-dev
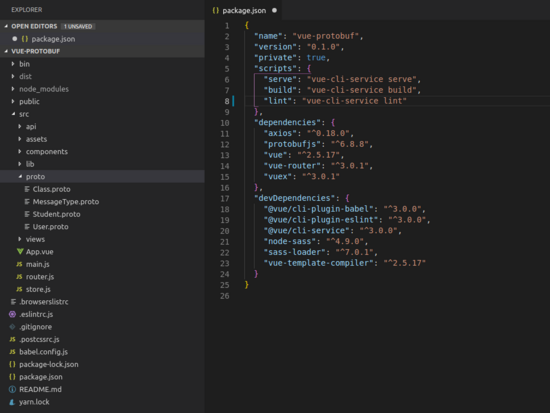
2.在 src 目录下新建一个 proto 目录,用来存放 *.proto 文件,并将写好的proto文件拷贝进去。
此时的项目目录和 package.json :
3.将 *.proto 文件生成 src/proto/proto.js (重点)
protobufjs 提供了一个叫 pbjs 的工具,这是一个神器,根据参数不同可以打包成xx.json或xx.js文件。比如我们想打包成json文件,在根目录运行:
npx pbjs -t json src/proto/*.proto > src/proto/proto.json
可以在 src/proto 目录下生成一个proto.json文件,查看请点击这里。 之前说了:实践证明打包成js模块才是最好用的。我这里直接给出最终的命令
npx pbjs -t json-module -w commonjs -o src/proto/proto.js src/proto/*.proto
-w 参数可以指定打包js的包装器,这里用的是commonjs,详情请各位自己去看文档。运行命令后在src/proto目录下生成的 proto.js 。在chrome中 console.log(proto.js) 一下:
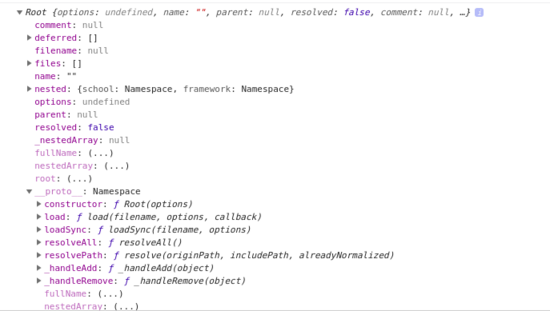
可以发现,这个模块在原型链上定义了 load , lookup
等非常有用的api,这正是后面我们将会用到的。 为以后方便使用,我们将命令添加到package.json的script中:
"scripts": {
 "serve": "vue-cli-service serve",
 "build": "vue-cli-service build",
 "lint": "vue-cli-service lint",
 "proto": "pbjs -t json-module -w commonjs -o src/proto/proto.js src/proto/*.proto"
 },
以后更新proto文件后,只需要 npm run proto 即可重新生成最新的proto.js。
4. 封装request.js
在前面生成了proto.js文件后,就可以开始封装与后端交互的基础模块了。首先要知道,我们这里是用axios来发起http请求的。
整个流程:开始调用接口 -> request.js将数据变成二进制 -> 前端真正发起请求 -> 后端返回二进制的数据 -> request.js处理二进制数据 -> 获得数据对象。
可以说request.js相当于一个加密解密的中转站。在 src/lib 目录下添加一个 request.js 文件,开始开发:
既然我们的接口都是二进制的数据,所以需要设置axios的请求头,使用arraybuffer,如下:
import axios from 'axios'
const httpservice = axios.create({
 timeout: 45000,
 method: 'post',
 headers: {
 'x-requested-with': 'xmlhttprequest',
 'content-type': 'application/octet-stream'
 },
 responsetype: 'arraybuffer'
})
messagetype.proto 里面定义了与后端约定的接口枚举、请求体、响应体。发起请求前需要将所有的请求转换为二进制,下面是request.js的主函数
import protoroot from '@/proto/proto'
import protobuf from 'protobufjs'
// 请求体message
const pbmessagerequest = protoroot.lookup('framework.pbmessagerequest')
// 响应体的message
const pbmessageresponse = protoroot.lookup('framework.pbmessageresponse')
const apiversion = '1.0.0'
const token = 'my_token'
function getmessagetypevalue(msgtype) {
 const pbmessagetype = protoroot.lookup('framework.pbmessagetype')
 const ret = pbmessagetype.values[msgtype]
 return ret
}
/**
 *
 * @param {*} msgtype 接口名称
 * @param {*} requestbody 请求体参数
 * @param {*} responsetype 返回值
 */
function request(msgtype, requestbody, responsetype) {
 // 得到api的枚举值
 const _msgtype = getmessagetypevalue(msgtype)
 // 请求需要的数据
 const reqdata = {
 timestamp: new date().gettime(),
 type: _msgtype,
 version: apiversion,
 messagedata: requestbody,
 token: token
 }
}
 // 将对象序列化成请求体实例
 const req = pbmessagerequest.create(reqdata)
 // 调用axios发起请求
 // 这里用到axios的配置项:transformrequest和transformresponse
 // transformrequest 发起请求时,调用transformrequest方法,目的是将req转换成二进制
 // transformresponse 对返回的数据进行处理,目的是将二进制转换成真正的json数据
 return httpservice.post('/api', req, {
 transformrequest,
 transformresponse: transformresponsefactory(responsetype)
 }).then(({data, status}) => {
 // 对请求做处理
 if (status !== 200) {
  const err = new error('服务器异常')
  throw err
 }
 console.log(data)
 },(err) => {
 throw err
 })
}
// 将请求数据encode成二进制,encode是proto.js提供的方法
function transformrequest(data) {
 return pbmessagerequest.encode(data).finish()
}
function isarraybuffer (obj) {
 return object.prototype.tostring.call(obj) === '[object arraybuffer]'
}
function transformresponsefactory(responsetype) {
 return function transformresponse(rawresponse) {
 // 判断response是否是arraybuffer
 if (rawresponse == null || !isarraybuffer(rawresponse)) {
  return rawresponse
 }
 try {
  const buf = protobuf.util.newbuffer(rawresponse)
  // decode响应体
  const decodedresponse = pbmessageresponse.decode(buf)
  if (decodedresponse.messagedata && responsetype) {
  const model = protoroot.lookup(responsetype)
  decodedresponse.messagedata = model.decode(decodedresponse.messagedata)
  }
  return decodedresponse
 } catch (err) {
  return err
 }
 }
}
// 在request下添加一个方法,方便用于处理请求参数
request.create = function (protoname, obj) {
 const pbconstruct = protoroot.lookup(protoname)
 return pbconstruct.encode(obj).finish()
}
// 将模块暴露出去
export default request
最后写好的具体代码请看: 。 其中用到了 lookup() , encode() , finish() , decode() 等几个proto.js提供的方法。
5. 调用request.js
在.vue文件直接调用api前,我们一般不直接使用request.js来直接发起请求,而是将所有的接口再封装一层,因为直接使用request.js时要指定请求体,响应体等固定的值,多次使用会造成代码冗余。
我们习惯上在项目中将所有后端的接口放在 src/api 的目录下,如针对student的接口就放在 src/api/student.js 文件中,方便管理。 将 getstudentlist 的接口写在 src/api/student.js 中
import request from '@/lib/request'
// params是object类型的请求参数
// school.pbstudentlistreq 是定义好的请求体model
// school.pbstudentlistrsp 是定义好的响应model
// getstudentlist 是接口名称
export function getstudentlist (params) {
 const req = request.create('pbstudentlistreq', params)
 return request('getstudentlist', req, 'school.pbstudentlistrsp')
}
// 后面如果再添加接口直接以此类推
export function getstudentbyid (id) {
 // const req = ...
 // return request(...)
}
6. 在.vue中使用接口
需要哪个接口,就import哪个接口,返回的是promise对象,非常方便。
<template>
 <div class="hello">
 <button @click="_getstudentlist">获取学生列表</button>
 </div>
</template>
<script>
import { getstudentlist } from '@/api/student'
export default {
 name: 'helloworld',
 methods: {
 _getstudentlist () {
  const req = {
  limit: 20,
  offset: 0
  }
  getstudentlist(req).then((res) => {
  console.log(res)
  }).catch((res) => {
  console.error(res)
  })
 }
 },
 created () {
 }
}
</script>
<style lang="scss">
</style>
总结
整个demo的代码: 。
前端使用的整个流程:
1. 将后端提供的所有的proto文件拷进 src/proto 文件夹
2. 运行 npm run proto 生成proto.js
3. 根据接口枚举在 src/api 下写接口
4. .vue 文件中使用接口。
(其中1和2可以合并在一起写一个自动化的脚本,每次更新只需运行一下这个脚本即可)。
写的比较啰嗦,文笔也不好,大家见谅。
这个流程就是我感觉比较好的一个proto在前端的实践,可能并不是最好,如果在你们公司有其他更好的实践,欢迎大家一起交流分享。
后续
在vue中使用是需要打包成一个js模块来使用比较好(这是因为vue在生产环境中打包成只有html,css,js等文件)。但在某些场景,比如在node环境中,一个express的项目,生产环境中是允许出现 .proto 文件的,这时候可以采取 protobuf.js 提供的其他方法来动态解析proto,不再需要npm run proto这种操作了。
以上所述是小编给大家介绍的vue中使用protobuf的过程记录,希望对大家有所帮助