移动客户端编译打包方式 | iOS
- 作者: 我不是律师
- 来源: 51数据库
- 2021-10-10
移动客户端编译打包方式 | ios。移动客户端的编译打包,是客户端ci的开始点。通过jenkins等持续集成平台,结合代码管理工具,搭建自动编译任务,按照约定的条件自动打包,能够节省人力,管理迭代提测版本,节省人力。
移动端编译打包,按照不同,可以分成android编译和ios编译两类,各自的编译工具和方式也各不相同,下面我们会分章节概述其主要的编译工具和方法。https://blog.csdn.net/sunshine586983/article/details/
ios端编译工具有很多,系统提供了xcodebuild、xcrun工具,另外,还有一些开源工具,比如xctool、plistbuddy等,可以辅助整个编译过程。https://blog.csdn.net/sunshine586983/article/details/
和android不同,ios的版本安装比较困难,拿到ipa后,一般是无法直接安装的(越狱系统除外),幸运的是,苹果提供了基于企业证书的ota(over the air)分发方式,可以通过网页的形式方便的安装ipa。本章将结合ota部署方式,详细讲解ios端的编译和分发。https://blog.csdn.net/sunshine586983/article/details/
https://blog.csdn.net/sunshine586983/article/details/
环境准备
https://blog.csdn.net/sunshine586983/article/details/
ota的部署,必须依赖这样两个证书:企业级发布证书以及对应的密钥(.mobileprovision文件以及.cer文件);企业级开发者证书以及密钥(.p12文件以及.cer文件)。这两个证书需要安装到你的编译机上,并加入到keychain中。https://blog.csdn.net/sunshine586983/article/details/
编译机上需要安装合适版本的xcode,同时安装xctool工具。接下来就可以执行整个编译打包过程了。https://blog.csdn.net/sunshine586983/article/details/
https://blog.csdn.net/sunshine586983/article/details/
编译及产物
https://blog.csdn.net/sunshine586983/article/details/
编译整个过程分成两大部分,打出ipa包,以及生成plist文件和html文件,为后续的ota部署提供物料。按照重点部分,描述编译过程如下:https://blog.csdn.net/sunshine586983/article/details/
1、解开钥匙链,获取证书使用权限https://blog.csdn.net/sunshine586983/article/details/
通过securityunlock-keychain -p username $pathtologin.keychain来解锁keychain。https://blog.csdn.net/sunshine586983/article/details/
https://blog.csdn.net/sunshine586983/article/details/
2、使用plistbuddy工具获取version以及identifierhttps://blog.csdn.net/sunshine586983/article/details/
version=`plistbuddy-c "print cfbundleversion" "${proj_plist_path}"`https://blog.csdn.net/sunshine586983/article/details/
bundleidentifier=`plistbuddy-c "print cfbundleidentifier" "${proj_plist_path}"`https://blog.csdn.net/sunshine586983/article/details/
https://blog.csdn.net/sunshine586983/article/details/
3、清理工作区间,开始打包,使用企业证书打签名https://blog.csdn.net/sunshine586983/article/details/
xctool -workspace $workspacename-scheme ${scheme_name} -reporter pretty -configuration debug cleanhttps://blog.csdn.net/sunshine586983/article/details/
xctool -workspace $workspacename-scheme ${scheme_name} -reporter pretty -configuration debugcode_sign_identity="${developer_name}" archivehttps://blog.csdn.net/sunshine586983/article/details/
其中,developer_name需要填写证书对应的机构名称,命令执行完之后,在xcode的工作目录下会生成对应的app文件夹,里面是各种编译产物,当然我们也可以使用-o参数,将生成app放到指定目录去。然后,我们需要使用xcrun工具对ipa打签名:https://blog.csdn.net/sunshine586983/article/details/
xcrun -sdk iphoneospackageapplication -v ${app_name} -o ${ipa_loc}/${ipa_name} -sign $code_sign_identity-embed ${provision_profile}https://blog.csdn.net/sunshine586983/article/details/
其中,provision_profile变量指向对应的企业证书的mobileprovisionfile的位置。https://blog.csdn.net/sunshine586983/article/details/
https://blog.csdn.net/sunshine586983/article/details/
4、保存dsym文件https://blog.csdn.net/sunshine586983/article/details/
3步骤之后,xcode工作目录下会生成一个dsyms文件夹,我们需要将里面的文件打包成.dsym文件,方便日后崩溃日志解析使用:https://blog.csdn.net/sunshine586983/article/details/
tar cvf "${proj_name}_ci.dsyms.tar""${proj_name}_ci.app.dsym"https://blog.csdn.net/sunshine586983/article/details/
https://blog.csdn.net/sunshine586983/article/details/
5、生成plist文件https://blog.csdn.net/sunshine586983/article/details/
ota部署,需要在对应的plist文件中定义ipa下载地址,我们在编译时获取ipa名称,bundleid等信息,填充到一个模版plist文件,为后面的ota部署做准备,plist模版如下:https://blog.csdn.net/sunshine586983/article/details/
https://blog.csdn.net/sunshine586983/article/details/
itemsassetskindhttps://blog.csdn.net/sunshine586983/article/details/
software-packagehttps://blog.csdn.net/sunshine586983/article/details/
url https://https://****/${ipa_name}https://blog.csdn.net/sunshine586983/article/details/
metadatahttps://blog.csdn.net/sunshine586983/article/details/
bundle-identifierhttps://blog.csdn.net/sunshine586983/article/details/
${bundleidentifier}https://blog.csdn.net/sunshine586983/article/details/
bundle-versionhttps://blog.csdn.net/sunshine586983/article/details/
${version}https://blog.csdn.net/sunshine586983/article/details/
kindhttps://blog.csdn.net/sunshine586983/article/details/
softwarehttps://blog.csdn.net/sunshine586983/article/details/
titlehttps://blog.csdn.net/sunshine586983/article/details/
${ipa_prefix}https://blog.csdn.net/sunshine586983/article/details/
https://blog.csdn.net/sunshine586983/article/details/https://blog.csdn.net/sunshine586983/article/details/
需要注意的是,software-package的值,要配置成ipa对应的url。https://blog.csdn.net/sunshine586983/article/details/
https://blog.csdn.net/sunshine586983/article/details/
ota部署
https://blog.csdn.net/sunshine586983/article/details/
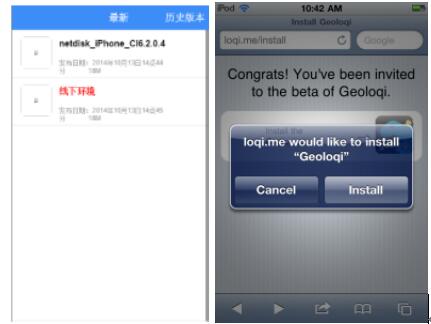
通过2.2.2节中的环境部署和编译之后,我们已经构建出了ipa包,dsym文件,以及对应的plist文件,但此时还无法编译,我们需要通过一个html,以特定的标签指定plist文件,直接通过网页进行ota安装。https://blog.csdn.net/sunshine586983/article/details/
html内容如下:https://blog.csdn.net/sunshine586983/article/details/
https://blog.csdn.net/sunshine586983/article/details/
https://blog.csdn.net/sunshine586983/article/details/
' itms-services://?action=download-manifest&url=https://***/${ipa_prefix}.plist'>https://blog.csdn.net/sunshine586983/article/details/
https://blog.csdn.net/sunshine586983/article/details/
https://blog.csdn.net/sunshine586983/article/details/
${ipa_prefix}https://blog.csdn.net/sunshine586983/article/details/
发布日期:${arch_time_with_format}${ipa_file_size}https://blog.csdn.net/sunshine586983/article/details/
https://blog.csdn.net/sunshine586983/article/details/
https://blog.csdn.net/sunshine586983/article/details/
https://blog.csdn.net/sunshine586983/article/details/
https://blog.csdn.net/sunshine586983/article/details/
https://blog.csdn.net/sunshine586983/article/details/
在html的配置中,需要注意的是,a标签中的这个值是固定的,itms-services://?action=download-manifest&url=https://blog.csdn.net/sunshine586983/article/details/
另外,url一定要使用https的方式访问,否则将无法访问plist文件。https://blog.csdn.net/sunshine586983/article/details/
最终,我们在界面上点击对应版本的item,即可直接安装ipahttps://blog.csdn.net/sunshine586983/article/details/