五:flask:源码解析
- 作者: 我叫敬业福
- 来源: 51数据库
- 2021-08-24
目录
- flask源码分析
- 一)项目启动
- 二)请求进来时
- 三)执行视图函数时
- 四)请求结束前
- 整个请求上下文执行流程
flask源码分析
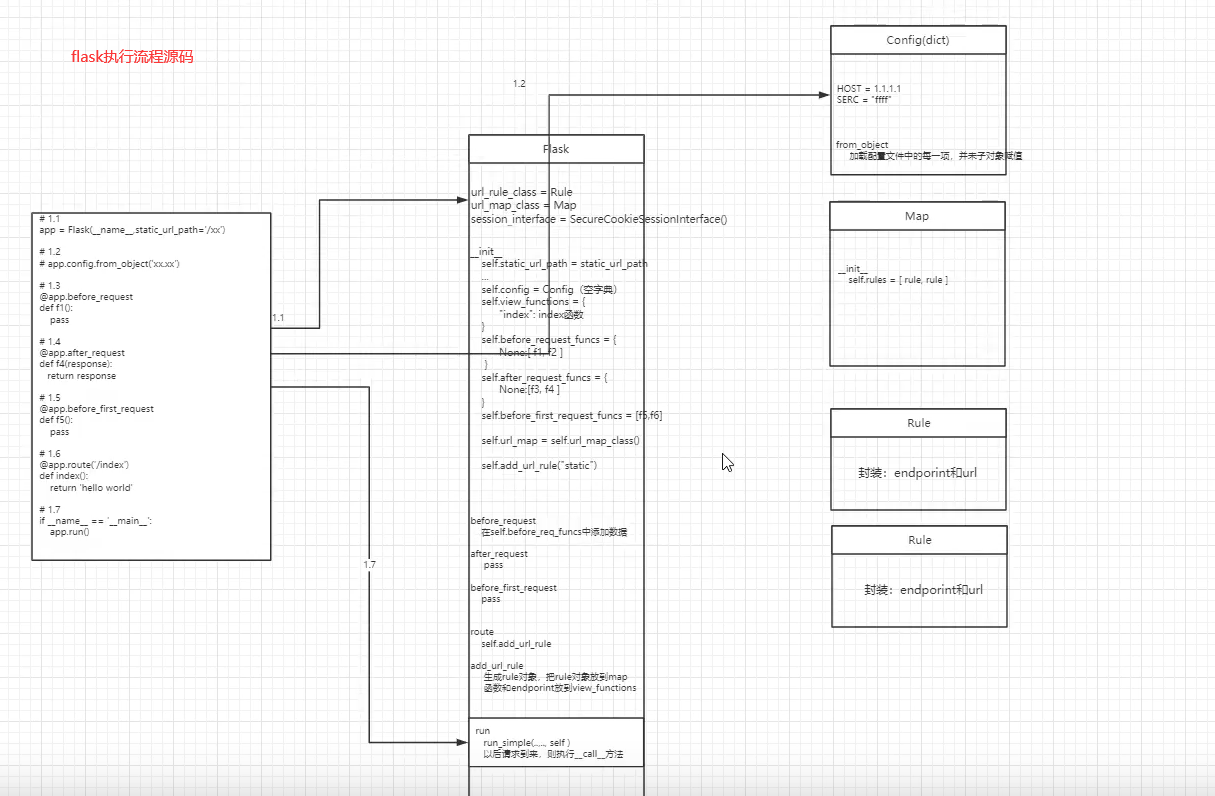
- 第一阶段:启动flask程序,加载特殊装饰器、路由,把它们封装到app = Flask对象中
- 第二阶段:请求到来
- 创建上下文对象:请求上下文、应用上下文
- 执行before / 视图 / after
- 销毁上下文对象
一)项目启动
-
实例化Flask对象
app = Flask(__name__) 1.对app对象封装一些初始化的值 static_url_path static_folder templates_folder 2.添加静态文件的路由 self.add_url_rule( self.static_url_path + "/<path:filename>", endpoint="static", host=static_host, view_func=self.send_static_file, ) 3.实例化了url_map对象 -
加载配置文件
from flask import Flask app = Flask(__name__) app.config.from_object('xx.xx') # 上面等同于下面 # v = app.config # v.from_object('xx.xx') 1.读取配置文件中的所有键值对,并将键值对全部放到config对象中。(config是一个字典) 2.将包含所有配置文件的config对象,赋值给app.config -
添加路由映射
from flask import Flask app = Flask(__name__) app.config.from_object('xx.xx') @app.route('/index/') def hello_world(): return 'Hello World!' 1.将 url = /index/ 和methods = ['GET', 'POST'] 和 endpoint = 'index' 封装到Rule对象。 2.将Rule对象添加到app.url_map中。 3.将endpoint和函数的对应关系放到app.view_functions中。 -
总结以上
app. config app.url_map : 存放路由对应关系 app.view_functions : 所有的都放在这里面 -
运行flask
  app.run()

  1.内部调用werkzeug的run_simple,内部创建socket,监听ip和端口,等待用户请求的到来。
  2.一旦有用户请求,执行app.__call__方法
  	class Flask(object):
  		def __call__(self, envion, start_response):
  			pass
  		def run(self):
  			run_simple(host, port, self, **options)
二)请求进来时
创建了RequestContext对象,里面封装了request和session
创建了AppContext对象,里面封装了app和g
启动一个flask项目时,会先执行app.run()方法,这是整个项目的入口,执行run方法时,接着执行werkzeug模块中的run_simple方法,werkzeug中触发调用了Flask的__call__方法,__call__方法的逻辑很简单,直接执行wsgi_app方法,将包含所有请求相关数据和一个响应函数传进去。
def wsgi_app(self, environ, start_response):
	"""
	创建ctx = RequestContext对象,内部封装了两个值
		request = Request(environ)
		session = None
	"""
    ctx = self.request_context(environ)
    error = None
    try:
        try:
	        """
			执行ctx.push
				- app_ctx = 创建AppContext对象(app, g)
				- 将app_ctx放入local中
				- 将ctx放入local中
				- session赋值
				- 路由匹配
			"""
            ctx.push()
            response = self.full_dispatch_request()
        except Exception as e:
            error = e
            response = self.handle_exception(e)
        except:
            error = sys.exc_info()[1]
            raise
        return response(environ, start_response)
    finally:
        if self.should_ignore_error(error):
            error = None
        ctx.auto_pop(error)
三)执行视图函数时
-
执行完
push方法后,接着执行full_dispatch_request方法,从这个名字中我们也能猜到,这个方法只要是负责请求的分发。 -
在full_dispatch_request方法中先执行
preprocess_request方法,这个方法,会先执行所有被before_request装饰器装饰的函数,然后就通过路由的分发执行视图函数了(dispatch_request)def full_dispatch_request(self): """ 触发所有的first_request函数 只有在启动程序后,第一个请求带来前执行,再次请求时就不会执行了。 """ self.try_trigger_before_first_request_functions() try: # 信号 request_started.send(self) """视图之前:执行所有的before_request""" rv = self.preprocess_request() if rv is None: """执行所有的视图函数""" rv = self.dispatch_request() except Exception as e: rv = self.handle_user_exception(e) """ 视图之后:详细看 四) - 1.执行所有的after_request - 2.保存session """ return self.finalize_request(rv) -
在执行视图函数之前,先执行了before_request,在执行我们的视图函数。视图函数主要处理业务逻辑。在视图函数中可以调用request对象,进行取值,也可以调用session对象对session的存取。
-
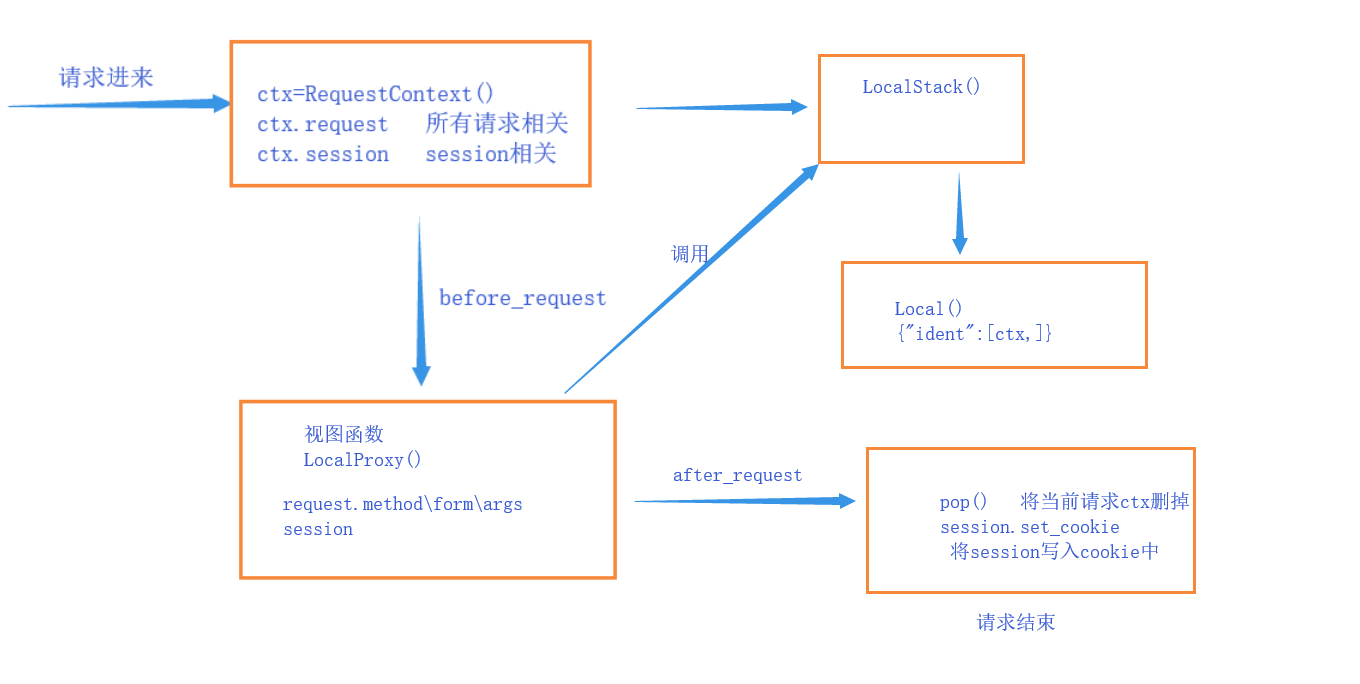
在整个request的请求生命周期中,获取请求的数据直接调用request即可,对session进行操作直接调用session即可。request和session都是LocalProxy对象,借助偏函数的概念将对应的值传入_lookup_req_object函数。先从_request_ctx_stack(LocalStack)对象中获取ctx(请求上下文对象),再通过反射分别获取request和session属性。整个过程中LocalStack扮演了一个全局仓库的角色,请求进来将数据存取,需要时即取即用。所以,flask实现了在整个请求的生命周期中哪儿需要就直接调用的特色。
request = LocalProxy(partial(_lookup_req_object, 'request'))
session = LocalProxy(partial(_lookup_req_object, 'session'))
四)请求结束前
-
视图函数执行完后,dispatch_request执行结束,执行full_dispatch_request方法的返回值finalize_request方法。这个方法中,同样的,在返回响应之前,先执行所有被after_request装饰器装饰的函数。
-
---->finalize_request ----> process_response
def process_response(self, response): ctx = _request_ctx_stack.top bp = ctx.request.blueprint funcs = ctx._after_request_functions if bp is not None and bp in self.after_request_funcs: funcs = chain(funcs, reversed(self.after_request_funcs[bp])) if None in self.after_request_funcs: funcs = chain(funcs, reversed(self.after_request_funcs[None])) for handler in funcs: response = handler(response) if not self.session_interface.is_null_session(ctx.session): self.session_interface.save_session(self, ctx.session, response) return response -
执行process_response过程中,执行完after_request后,然后,执行session的save_session方法。将内存中保存在ctx.session的值取到后,json.dumps()序列化后,写入响应的cookie中(set_cookie),最后返回响应。
def save_session(self, app, session, response): domain = self.get_cookie_domain(app) path = self.get_cookie_path(app) # If the session is modified to be empty, remove the cookie. # If the session is empty, return without setting the cookie. if not session: if session.modified: response.delete_cookie( app.session_cookie_name, domain=domain, path=path ) return # Add a "Vary: Cookie" header if the session was accessed at all. if session.accessed: response.vary.add('Cookie') if not self.should_set_cookie(app, session): return httponly = self.get_cookie_httponly(app) secure = self.get_cookie_secure(app) samesite = self.get_cookie_samesite(app) expires = self.get_expiration_time(app, session) val = self.get_signing_serializer(app).dumps(dict(session)) # set_cookie将session写入响应的cookie中 response.set_cookie( app.session_cookie_name, val, expires=expires, httponly=httponly, domain=domain, path=path, secure=secure, samesite=samesite ) -
返回响应后,自动的调用
ctx.auto_pop(error),将Local中存储的ctx对象pop掉,整个请求结束。
整个请求上下文执行流程