Yolov5训练自建数据集
- 作者: 你的网名那么丶
- 来源: 51数据库
- 2021-10-19
环境安装暂不缀述
1.数据准备
本人将数据放在了yolo-master项目下自建了coco目录,目录结构如下:
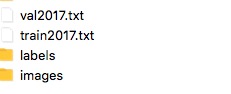
val2017.txt:保存验证集的图片(绝对路径,相对路径可能会报错)
train2017.txt:保存训练集的图片(绝对路径)
labels:保存val和train下图片的ground truth
images:保存val和train的图片
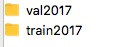
其中,labels下目录结构如下,与images目录相同,只不过labels/val2017和labels/train2017分别对应images/val2017和images/train2017下每张图片的标签(这个标签是经过归一化的):
1.1 生成val2017.txt和train2017.txt的代码如下:
即生成记录图片路径的txt文件。
import os
image_path = './coco/images/val2017/'#修改为自己的路径
file = open('./coco/val2017.txt', 'w')#修改为自己的路径

for filename in os.listdir(image_path):
 if(filename.endswith('.jpg')):
    print(filename)
    file.write(image_path+filename)
    file.write('\n')
1.2 将coco格式的JSON标注文件,转成yolo的训练格式
import json
import cv2
import os
import numpy as np

j = 0

def convert(size, box):
    dw = 1. / size[0]
    dh = 1. / size[1]
    # 计算中心坐标,xml文件中使用(左上角坐标,右下角坐标)标定一个框,需要转换为中心坐标,宽、高的形式
    x = box[0] + box[2]/ 2.0
    y = box[1] + box[3]/ 2.0
    # 计算宽高
    w = box[2]
    h = box[3]
    # 所有数据归一化处理
    x = x * dw
    w = w * dw
    y = y * dh
    h = h * dh
    return (x, y, w, h)


def get_key(dict, value):
    return [k for k, v in dict.items() if v == value]

def gen_txt(anno_file_paths):

        try:
            with open(anno_file_paths, encoding='gbk') as f:
                anno_content = f.read()
        except:
            try:
                with open(anno_file_paths, encoding='utf8') as f:
                    anno_content = f.read()
            except:
                print(anno_file_paths)
                raise Exception()

        images_content = json.loads(anno_content)['images']
        cls_content = json.loads(anno_content)['categories']
        annotations = json.loads(anno_content)['annotations']

        image_list = []
        for i in range(len(images_content)):
            image_list.append(images_content[i]['file_name'])

        for uu in range(len(image_list)):
            global j
            out_file = open('./coco/labels/val2017/%s.txt' % (os.path.splitext(image_list[uu])[0]), 'w')  # 这里改成自己的需要存放txt转换结果的路径
            # for j in range(len(annotations)):
            while(j<len(annotations)):
                print("j",j)
                id = annotations[j]['image_id']
                print(uu,id)
                lujing = image_list[id]
                # print(lujing)
                file_path = './coco/val2017'
                im = cv2.imread(os.path.join(file_path,lujing))
                height, width, _ = im.shape
                if(id == uu):
                    bbox = annotations[j]['bbox']
                    bb = convert((width,height),bbox)

                    out_file.write(str(annotations[j]['category_id']) + " " + " ".join([str(a) for a in bb]) + '\n')
                    j = j+1
                if(id > uu):
                    break
if __name__ == '__main__':
    gen_txt("JSON路径")
2.修改配置文件
2.1 首先修改data/coco.yaml
#修改为自己数据集的路径(此txt记录数据集中图片的绝对路径,代码参见1.1)
train: ./coco/train2017.txt
val: ./coco/val2017.txt
test: ./coco/test2017.txt

# 自建数据集的类别数目
nc: number of classes

#自建数据的类别
names: classes
2.2其次修改models下yolov5s(m,l等)中一个地方即可,”nc“改成自建数据集的类别
3.开始训练
python train.py --data coco.yaml --cfg yolov5s.yaml --weights '' --batch-size 64 --img 640 --device 1
                                         yolov5m                                40
                                         yolov5l                                24
                                         yolov5x                                16
其中
epochs:指的就是训练过程中整个数据集将被迭代多少次
batch-size:一次看完多少张图片才进行权重更新,梯度下降的mini-batch
cfg:存储模型结构的配置文件
data:存储训练、测试数据的文件
img-size:输入图片宽高,显卡不行你就调小点。
rect:进行矩形训练
resume:恢复最近保存的模型开始训练
nosave:仅保存最终checkpoint
notest:仅测试最后的epoch
evolve:进化超参数
bucket:gsutil bucket
cache-images:缓存图像以加快训练速度
weights:权重文件路径(’'表示从头开始训练)
name: 重命名results.txt to results_name.txt
device:cuda device, i.e. 0 or 0,1,2,3 or cpu
adam:使用adam优化
multi-scale:多尺度训练,img-size +/- 50%
single-cls:单类别的训练集