CentOS7下安装配置Oracle的操作步骤教程
- 作者: 追逐00
- 来源: 51数据库
- 2021-10-19
1.安装centos7
配置如下:
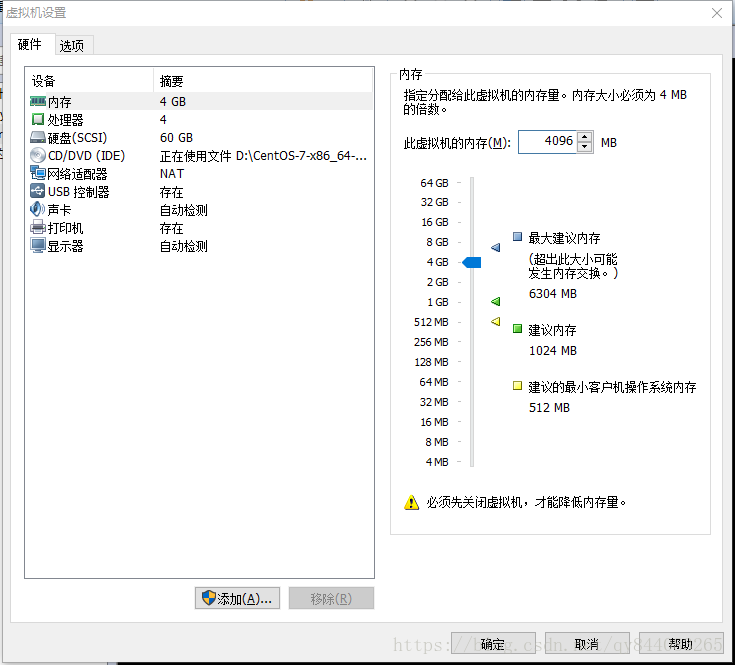
安装时必须安装ghome桌面
安装完成后,以root用户登录,然后执行
#需要联网
yum update
yum upgrade
2.安装java 环境
#查询出默认安装java
rpm -qa | grep java
#删除查询出结果
rpm -e --nodeps
#安装java
rpm -ivh  jdk-7u80-linux-x64.rpm
#配置环境变量
vim /etc/profile
#在末尾添加
#set java environment
java_home=/usr/java/jdk1.7.0_80
jre_home=/usr/java/jdk1.7.0_80/jre
class_path=.:$java_home/lib/dt.jar:$java_home/lib/tools.jar:$jre_home/lib
path=$path:$java_home/bin:$jre_home/bin:/usr/local/mysql/bin
export java_home jre_home class_path path
3.安装 oracle 11r2
首先下载oracle 11r2 安装包
linux.x64_11gr2_database_1of2.zip
linux.x64_11gr2_database_2of2.zip
创建用户和用户组
  groupadd oinstall #用户组
  groupadd dba #用户组
  useradd -g dba -g oinstall -m oracle #创建用户oracle,并加入dba,oinstall
  passwd oracle #设置密码
创建oracle安装目录
  mkdir -p /oracle/orainventory #oracle 数据库配置目录
chown -r oracle:oinstall /oracle #设置目录所有者为 oinstall 用户组的 oracle 用户
chown -r oracle:oinstall /oracle/orainventory
修改系统标识
  vim /etc/redhat-release #编辑
  把
centos linux release 7.0.1406 (core)
修改为
#centos linux release 7.0.1406 (core)
red hat enterprise linux 6

修改系统内核
vim /etc/sysctl.conf #编辑,在最后添加以下代码
fs.aio-max-nr = 1048576
fs.file-max = 6815744
kernel.shmall = 2097152
kernel.shmmax = 536870912
kernel.shmmni = 4096
kernel.sem = 250 32000 100 128
net.ipv4.ip_local_port_range = 9000 65500
net.core.rmem_default = 262144
net.core.rmem_max = 4194304
net.core.wmem_default = 262144
net.core.wmem_max = 1048576
net.ipv4.icmp_echo_ignore_broadcasts = 1

vim /etc/security/limits.conf #在末尾添加以下代码

oracle           soft    nproc           2047
oracle           hard    nproc           16384
oracle           soft    nofile          1024
oracle           hard    nofile          65536

配置oracle用户环境变量

vim /home/oracle/.bash_profile #在最后添加以下代码

export oracle_base=/oracle #oracle 数据库安装目录
export oracle_home=$oracle_base/product/11.2.0/db_1 #oracle 数据库路径
export oracle_sid=orcl #oracle 启动数据库实例名
export oracle_unqname=$oracle_sid
export path=$oracle_home/bin:/user/sbin:$path #添加系统环境变量
export ld_library_path=$oracle_home/lib:$ld_library_path #添加系统环境变量
安装oracle数据库所需要的软件包
yum install gcc* gcc-* gcc-c++-* glibc-devel-* glibc-headers-* compat-libstdc* libstdc* elfutilslibelf-devel* libaio-devel* sysstat* unixodbc-* pdksh-*
4.重启下系统,以oracle身份登录系统
5.解压oracle安装包
unzip linux.x64_11gr2_database_1of2.zip
unzip linux.x64_11gr2_database_2of2.zip
6.
cd database
7.
export lang=en_us #防止乱码
8.运行安装程序(不要使用xshell操作,直接在桌面打开终端操作)
./runinstaller
等待......

取消默认选择,点击next
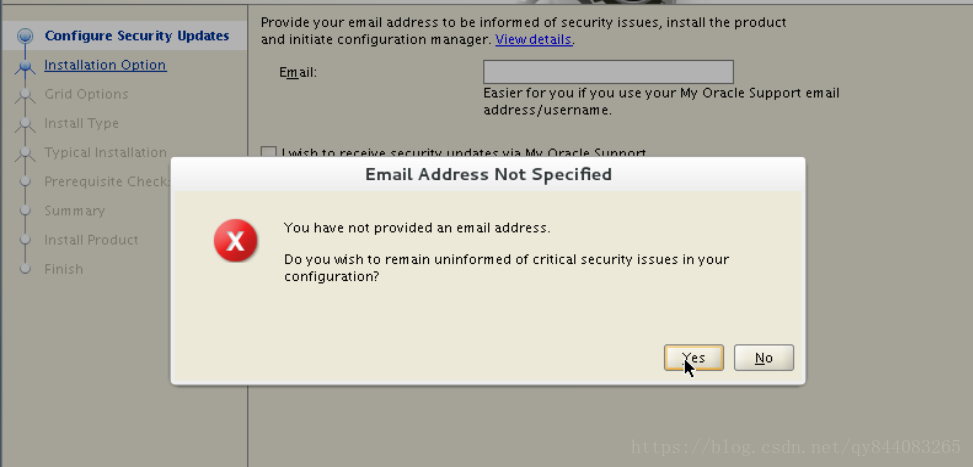
点击yes

点击next
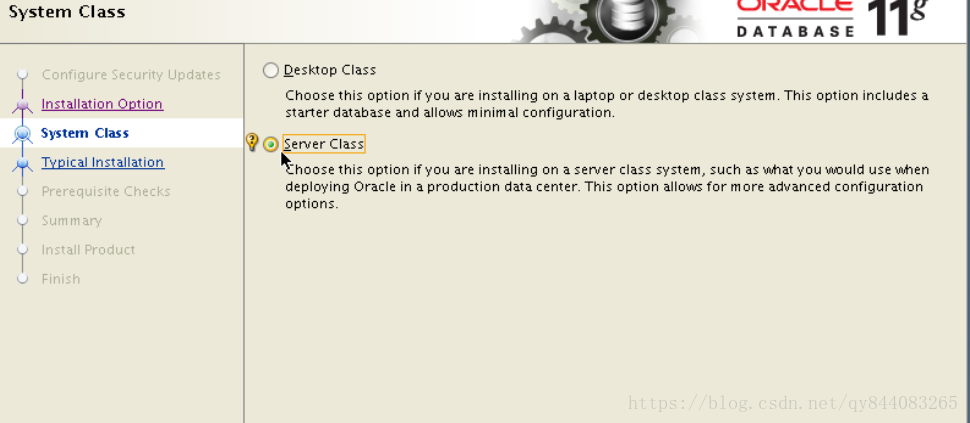
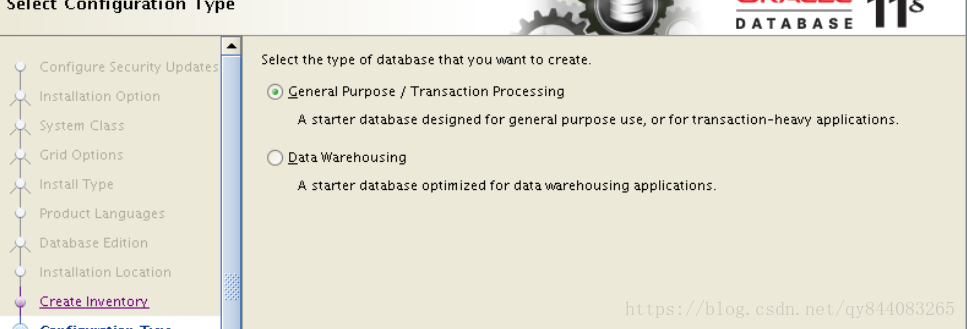
选择server class ,点击next

点击next
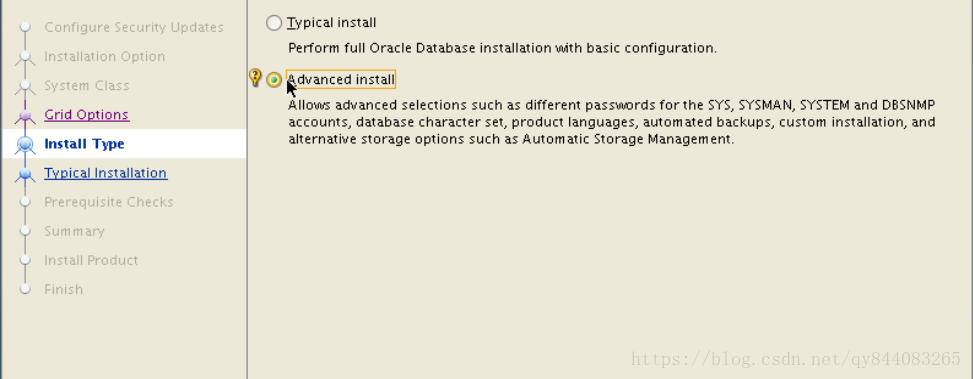
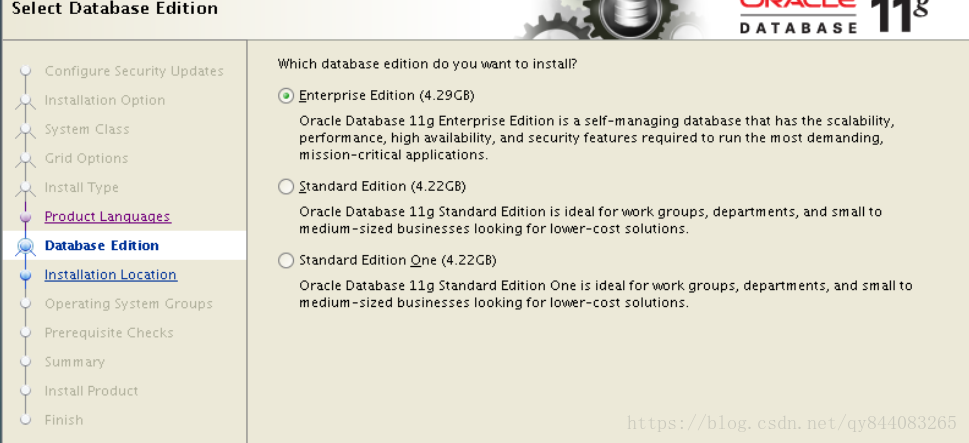
选择 advanced install 点击 next
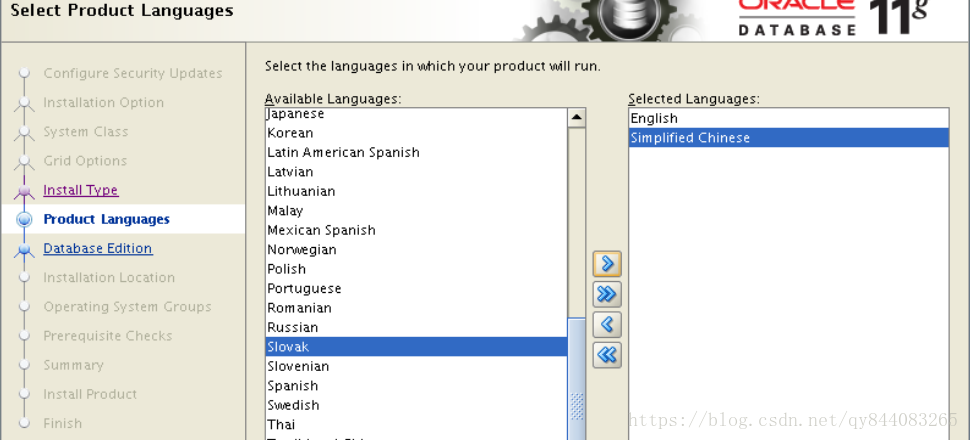
添加简体中文,点击next
点击next

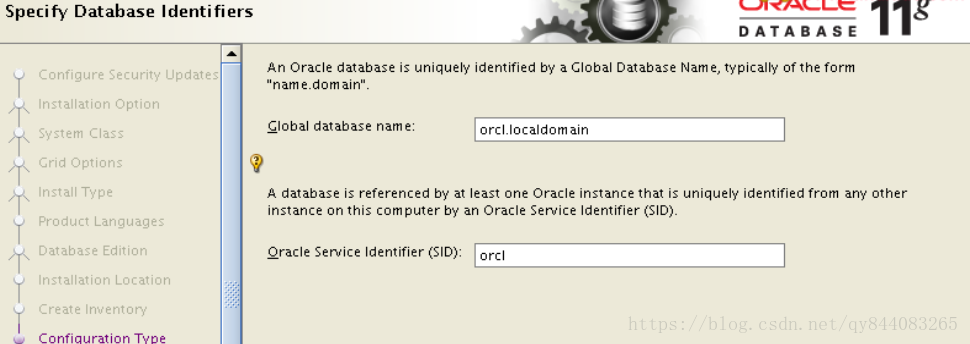
设置好环境变量了,这里会自动填充路径,点击 next
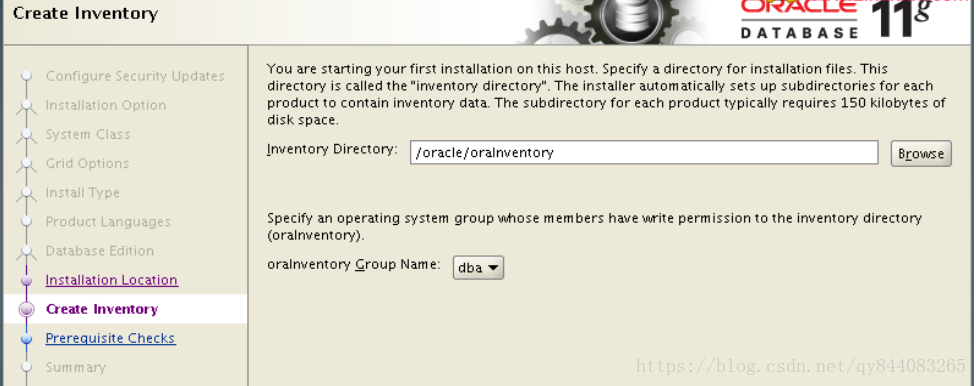
默认inventory directory为/orainventory,修改为/oracle/orainventory 点击next
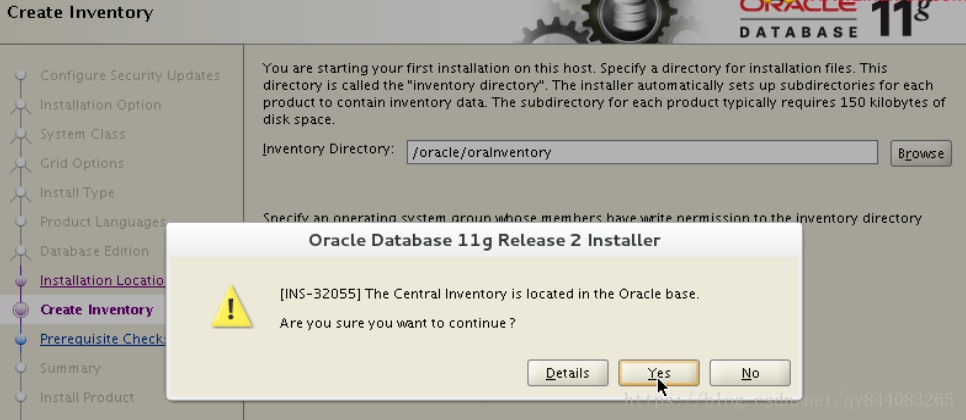
点击yes,弹框可能显示不出来,按方向键左键,按enter
点击next
点击next
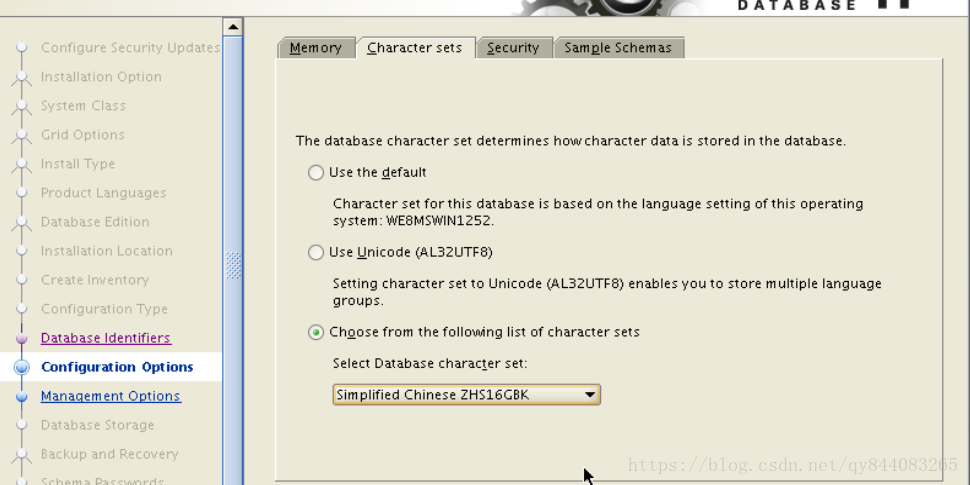
配置字符集,点击 next

点击next
点击next
点击next
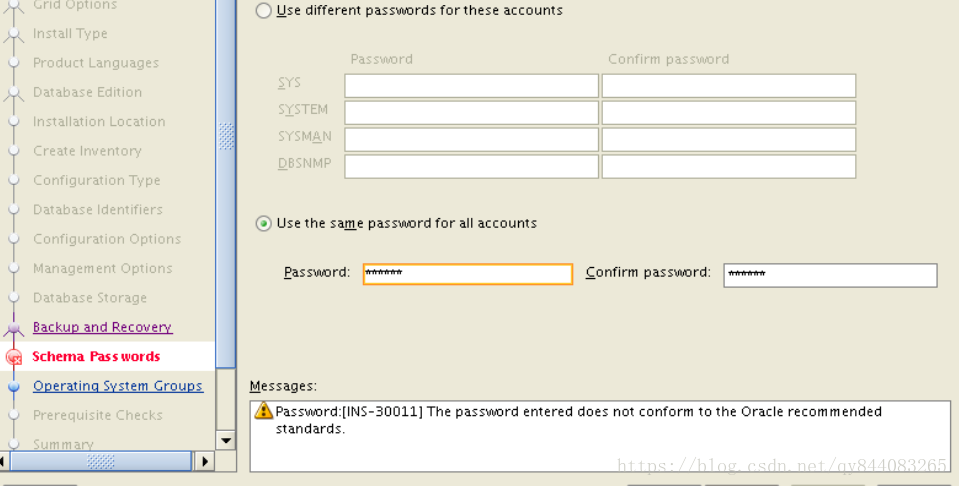
选择统一设置密码,点击 next
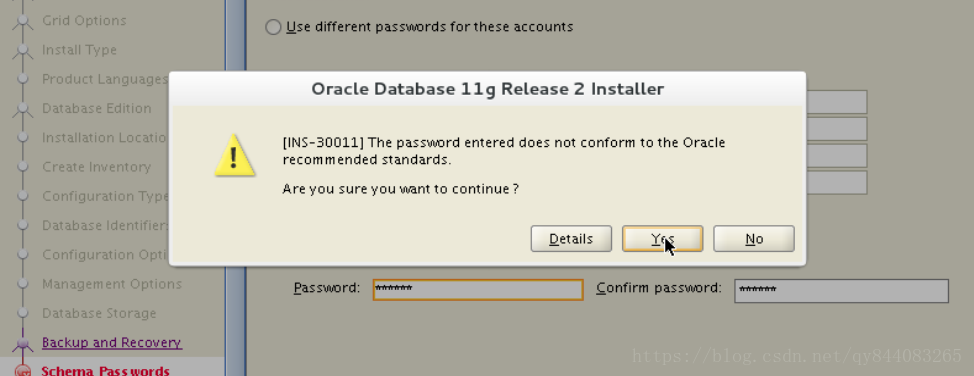
点击yes,弹框可能显示不出来,按方向键左键,按enter
点击next
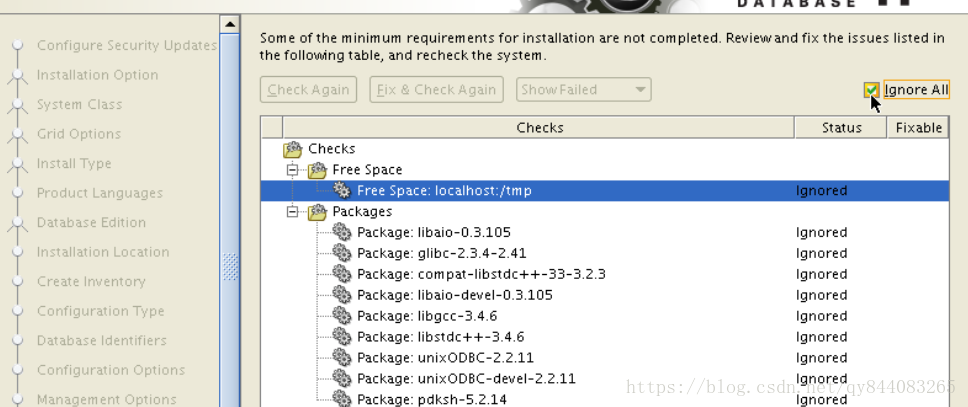
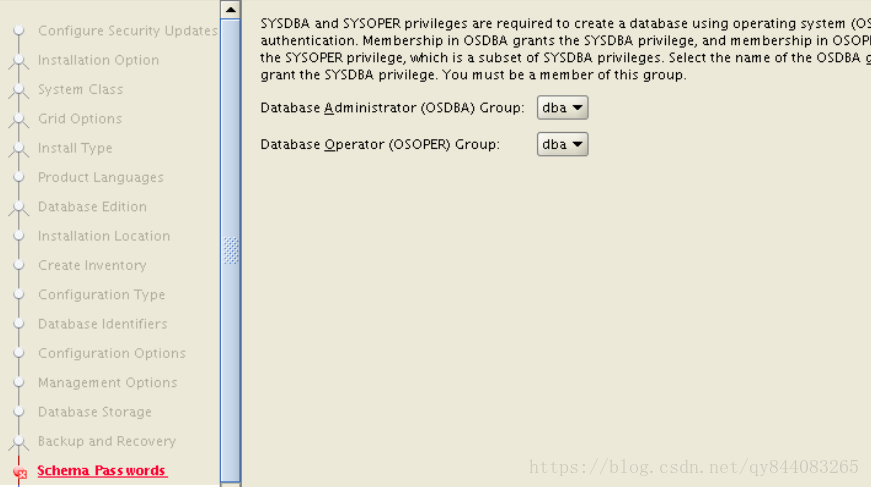
勾选ignore all,点击next
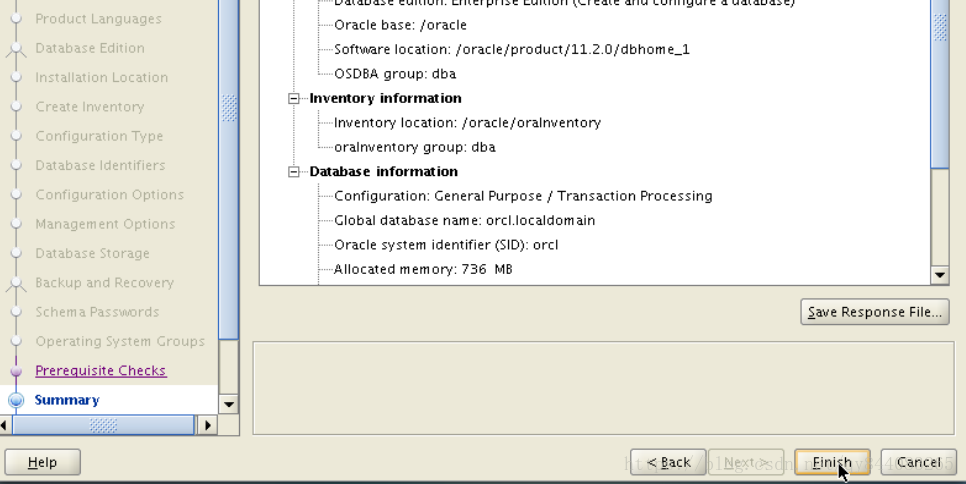
点击finish
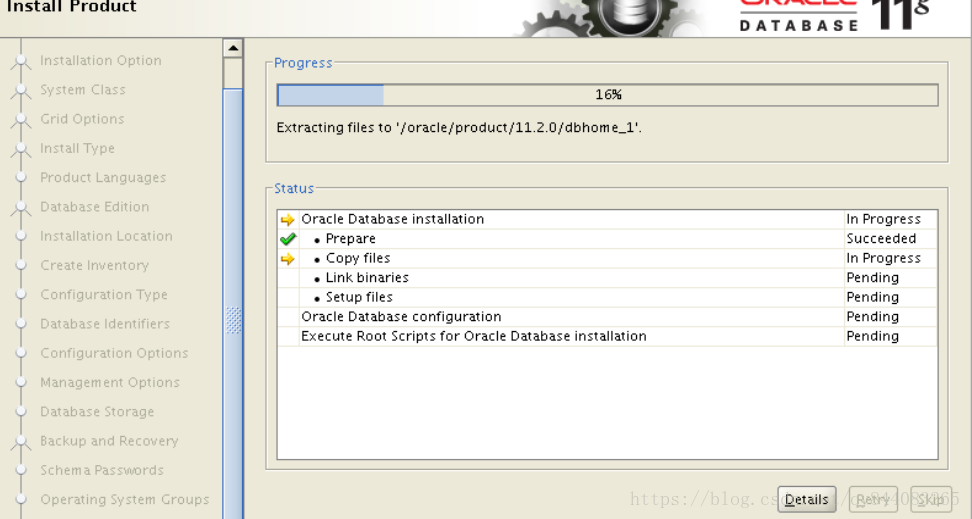
进入安装过程
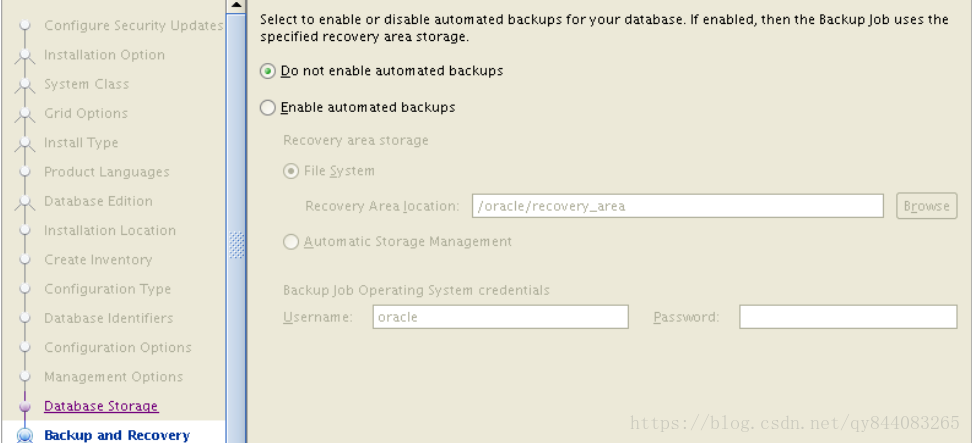
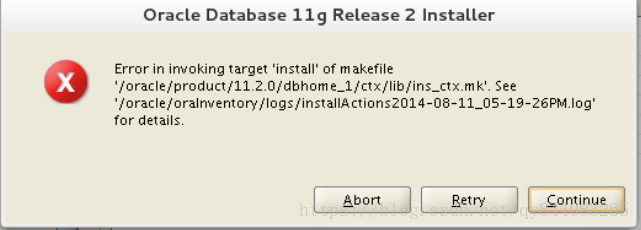
安装到 68%的时候会有如下提示,直接点击 continue,弹框可能无法展示,直接按enter
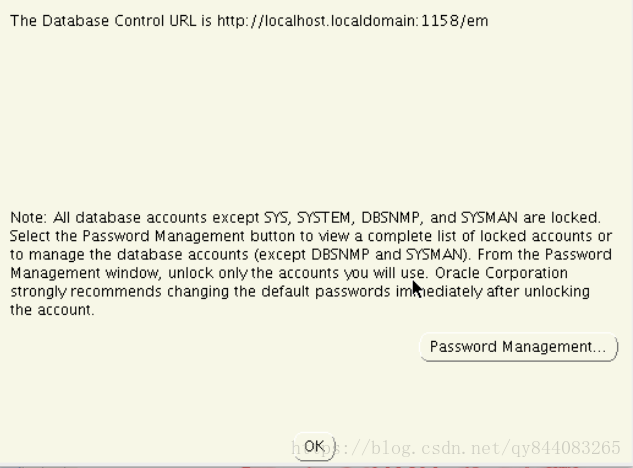
点击ok
以下窗口可能被缩成一条竖线在中间,用鼠标拉开即可看到,安装过程如出现窗口变暗,但是没有弹框弹出,即为此类情况
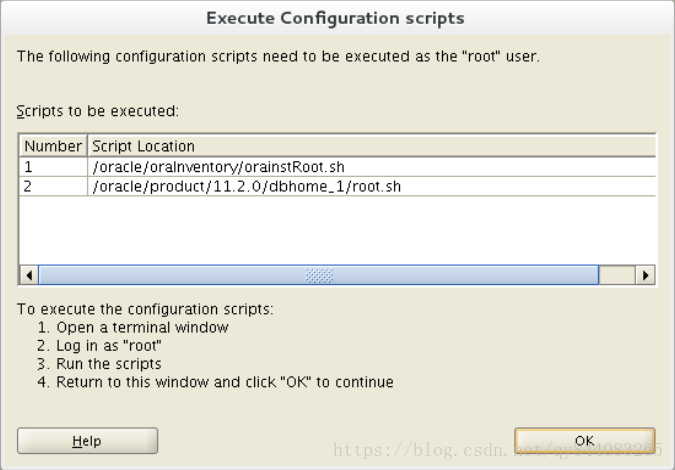
9.打开命令行窗口
su
输入 root 帐号密码,运行
/oracle/orainvertory/orainstroot.sh
/oracle/product/11.2.0/dbhome_1/root.sh
10.安装完成后,把系统标识修改回来
vim /etc/redhat-release #编辑
把
#centos linux release 7.0.1406 (core)
red hat enterprise linux 6
修改为:
centos linux release 7.0.1406 (core)
11.登录oracle
[oracle@localhost ~]$ lsnrctl stop                #先关闭监听服务

 [oracle@localhost ~]$ lsnrctl start                    #开启监听服务

 [oracle@localhost ~]$ sqlplus / as sysdba     #登入

sql> shutdown immediate             #立即关闭数据库服务(一般是关闭状态)
sql> startup                                    #开启数据库服务(重要,必输)

sql> exit                                 #退出

sql> sqlplus scott/tiger@192.168.47.131/orcl    #连接scott用户

sql> select * from tab;                  #test查询表
12,使用pl/sql连接时,可能会“ora-12514 tns 监听程序当前无法识别连接描述符中请求服务”
解决办法简述:
1.修改\oracle\product\11.2.0\db_1\network\admin\listener.ora中的(host)bt-199-039.bta.net.cn改为192.168.47.131
2.修改\oracle\product\11.2.0\db_1\network\admin\tnsnames.ora中的(host)bt-199-039.bta.net.cn 改为192.168.47.131
3.修改后,重启oracle,监听,并注册,主win10上的plsql就可以远程连接虚拟机上的数据库了.
具体操作步骤如下:
一、修改数据库服务器中listener.ora文件内容
[oracle@localhost admin]$ vim /oracle/product/11.2.0/db_1/network/admin/listener.ora
原始内容:


# listener.ora network configuration file: /oracle/product/11.2.0/db_1/network/admin/listener.ora

# generated by oracle configuration tools.

listener =

  (description_list =

    (description =

      (address = (protocol = ipc)(key = extproc1521))

      (address = (protocol = tcp)(host = bt-199-039.bta.net.cn)(port = 1521))

    )

  )

adr_base_listener = /oracle
修改为
# listener.ora network configuration file: /oracle/product/11.2.0/db_1/network/admin/listener.ora
# generated by oracle configuration tools.

sid_list_listener =
(sid_list =
(sid_desc =
(global_dbname = orcl)
(oracle_home = /oracle/product/11.2.0/db_1)
(sid_name = orcl)
)
)
listener = (description = (address = (protocol = tcp)(host = 192.168.47.131)(port = 1521)))
adr_base_listener = /oracle
修改数据库服务器中tnsnames.ora文件内容
[oracle@localhost admin]$ vim /oracle/product/11.2.0/db_1/network/admin/tnsnames.ora

原始内容:


# tnsnames.ora network configuration file: /oracle/product/11.2.0/db_1/network/admin/tnsnames.ora

# generated by oracle configuration tools.

orcl =

  (description =

    (address = (protocol = tcp)(host = localhost)(port = 1521))

    (connect_data =

      (server = dedicated)

      (service_name = orcl)

    )

  )
修改后的内容:

# tnsnames.ora network configuration file: /oracle/product/11.2.0/db_1/network/admin/tnsnames.ora

# generated by oracle configuration tools.

orcl =

  (description =

    (address_list =

      (address = (protocol = tcp)(host = 192.168.47.131)(port = 1521))

    )

    (connect_data =

      (sid = orcl)

    )

  )
在数据库服务器中启动监听并更新注册
1、命令:

[oracle@localhost ~]$ lsnrctl stop                #先关闭监听服务

输出:

lsnrctl for linux: version 11.2.0.1.0 - production on 19-feb-2017 21:19:42

copyright (c) 1991, 2009, oracle.  all rights reserved.

connecting to (description=(address=(protocol=tcp)(host=192.168.78.130)(port=1521)))

the command completed successfully

[oracle@localhost ~]$


2、命令:

[oracle@localhost ~]$ lsnrctl start                    #开启监听服务
输出:


lsnrctl for linux: version 11.2.0.1.0 - production on 19-feb-2017 21:24:22

copyright (c) 1991, 2009, oracle.  all rights reserved.

starting /data/oracle/product/11.2.0/db_1/bin/tnslsnr: please wait...

tnslsnr for linux: version 11.2.0.1.0 - production

system parameter file is /data/oracle/product/11.2.0/db_1/network/admin/listener.ora

log messages written to /data/oracle/diag/tnslsnr/localhost/listener/alert/log.xml

listening on: (description=(address=(protocol=tcp)(host=192.168.78.130)(port=1521)))


connecting to (description=(address=(protocol=tcp)(host=192.168.78.130)(port=1521)))

status of the listener

------------------------

alias                     listener

version                   tnslsnr for linux: version 11.2.0.1.0 - production

start date                19-feb-2017 21:24:22

uptime                    0 days 0 hr. 0 min. 0 sec

trace level               off

security                  on: local os authentication

snmp                      off

listener parameter file   /data/oracle/product/11.2.0/db_1/network/admin/listener.ora

listener log file         /data/oracle/diag/tnslsnr/localhost/listener/alert/log.xml

listening endpoints summary...

  (description=(address=(protocol=tcp)(host=192.168.78.130)(port=1521)))

services summary...

service "orcl" has 1 instance(s).

  instance "orcl", status unknown, has 1 handler(s) for this service...

the command completed successfully

[oracle@localhost ~]$


3、命令:

[oracle@localhost ~]$ sqlplus / as sysdba     #登入

输出:

sql*plus: release 11.2.0.1.0 production on sun feb 19 21:27:40 2017

copyright (c) 1982, 2009, oracle.  all rights reserved.

connected to:

oracle database 11g enterprise edition release 11.2.0.1.0 - 64bit production

with the partitioning, olap, data mining and real application testing options

sql>

命令:

sql> shutdown immediate             #立即关闭数据库服务

输出:

database closed.

database dismounted.

oracle instance shut down.

sql>


命令:
sql> startup                                    #开启数据库服务

输出:

oracle instance started.

total system global area 1586708480 bytes

fixed size                2213736 bytes

variable size                  939526296 bytes

database buffers           637534208 bytes

redo buffers                    7434240 bytes

database mounted.

database opened.

sql>


命令:
sql> alter system register;        #注册

输出:

system altered.

sql>
命令:

sql> quit         #登出

输出:

disconnected from oracle database 11g enterprise edition release 11.2.0.1.0 - 64bit production

with the partitioning, olap, data mining and real application testing options

[oracle@localhost ~]$


命令:
[oracle@localhost ~]$ lsnrctl status        #查看监听状态

输出:

lsnrctl for linux: version 11.2.0.1.0 - production on 19-feb-2017 21:37:20

copyright (c) 1991, 2009, oracle.  all rights reserved.

connecting to (description=(address=(protocol=tcp)(host=192.168.78.130)(port=1521)))

status of the listener

------------------------

alias                     listener

version                   tnslsnr for linux: version 11.2.0.1.0 - production

start date                19-feb-2017 21:24:22

uptime                    0 days 0 hr. 12 min. 57 sec

trace level               off

security                  on: local os authentication

snmp                      off

listener parameter file   /data/oracle/product/11.2.0/db_1/network/admin/listener.ora

listener log file         /data/oracle/diag/tnslsnr/localhost/listener/alert/log.xml

listening endpoints summary...

  (description=(address=(protocol=tcp)(host=192.168.78.130)(port=1521)))

services summary...

service "orcl" has 1 instance(s).

  instance "orcl", status unknown, has 1 handler(s) for this service...

the command completed successfully

[oracle@localhost ~]$