Unity实现引导页效果
- 作者: 蒙多叫兽
- 来源: 51数据库
- 2021-09-01
本文实例为大家分享了unity实现引导页效果的具体代码,供大家参考,具体内容如下
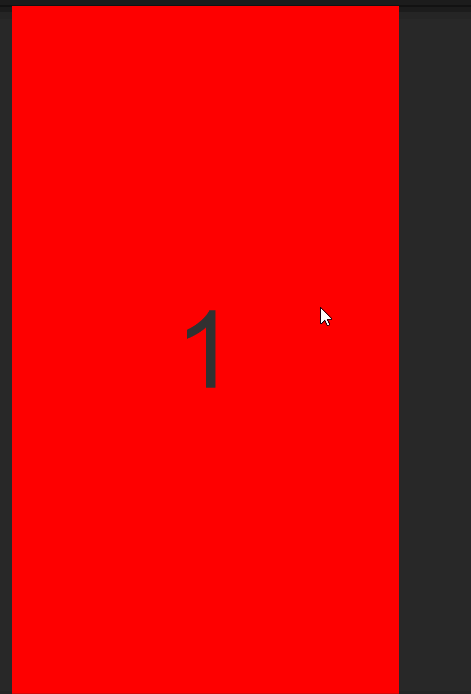
效果图:
1、创建canvas,设置rendermode=screenspace-overlay,uiscalemode = scalewithscreensize,
referenceresolution(x=1080,y=1920)
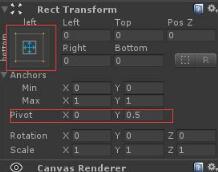
2、创建一个rawimage,命名为(parentgoimg),并做如下设置
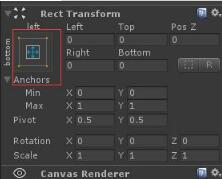
3、在parentgoimg下建几个rawimage,赋予想展示的图片,并做如下设置
4、添加如下脚本给parentgoimg
using system.collections;
using system.collections.generic;
using unityengine;
using unityengine.eventsystems;
using dg.tweening;
using unityengine.ui;

public class asd : monobehaviour,ibegindraghandler, idraghandler,ienddraghandler
{
  /// <summary>
  /// 可移动的最大最小x轴坐标
  /// </summary>
  private float minx, maxx;
  /// <summary>
  /// 开始触摸时,算出偏移值,防止跳变
  /// </summary>
  private float offsetx;

  /// <summary>
  /// 灵敏度
  /// </summary>
  private float sensitivityx;
  /// <summary>
  /// 当前显示第几页
  /// </summary>
  private int currentshowindex = 1;

  private void start()
  {
    (transform as recttransform).pivot = new vector2(0, 0.5f);
    debug.log(screen.width + "  " + screen.height);
    for (int i = 0; i < transform.childcount; i++)
    {
      (transform.getchild(i) as recttransform).sizedelta = new vector2(0, 0);
      //canvas的rendermode要设置成overlay形式
      //这里i*1080是因为canvas的uiscalemode设置成了scalewithscreensize,resolution为x=1080,y=1920
      //如果canvas的uiscalemode设置成constantpixelsize则吧这里的i*1080改成i*screen.width
      (transform.getchild(i) as recttransform).anchoredposition = new vector2(i * 1080.0f, 0);
    }

    minx = -((transform.childcount - 1) * screen.width);
    maxx = 0.0f;
    //如果移动超过页面的五分之一,则切换页面
    sensitivityx = screen.width / 5;
  }

  public void onbegindrag(pointereventdata eventdata)
  {
    offsetx = transform.position.x - input.mouseposition.x;
  }

  public void ondrag(pointereventdata eventdata)
  {
    //将物体坐标限制在最大最小x轴坐标内
    transform.position = new vector2(input.mouseposition.x + offsetx, transform.position.y);
    if (transform.position.x <= minx)
    {
      transform.position = new vector2(minx, transform.position.y);
    }
    else if (transform.position.x >= maxx)
    {
      transform.position = new vector2(maxx, transform.position.y);
    }
  }

  public void onenddrag(pointereventdata eventdata)
  {
    //判断坐标,是否需要切换页面
    if (transform.position.x > getleftx())
    {
      currentshowindex--;
    }
    else if (transform.position.x < getrightx())
    {
      currentshowindex++;
    }
    transform.domovex(-(currentshowindex - 1) * screen.width, 0.2f);
  }

  float getleftx() {
    return -((currentshowindex - 1) * screen.width - sensitivityx);
  }

  float getrightx() {
    return -((currentshowindex - 1) * screen.width + sensitivityx);
  }
}
运行即可看到效果
以上就是本文的全部内容,希望对大家的学习有所帮助,也希望大家多多支持。
推荐阅读
- C#通过fleck实现wss协议的WebSocket多人Web实时聊天(附源码)
- 团队城市未满足要求:MSBuildTools12.0_x86_Path 存在
- 使用 MSBuild.exe 在发布模式下构建 C# 解决方案
- 当我发布 Web 应用程序时,AfterPublish 脚本不运行
- 构建时 T4 转换的产品仅在下一个构建中使用
- ASP.NET Core Application (.NET Framework) for Windows x64 only error in project.assets.json
- 新的 .csproj 格式 - 如何将整个目录指定为“链接文件"到子目录?
- 如何将条件编译符号(DefineConstants)传递给 msbuild
- MSBuild 支持 Visual Studio 2017 RTM 中的 T4 模板
- NuGet 包还原找不到包,没有源
热点文章

团队城市未满足要求:MSBuildTools12.0_x86_Path 存在
0
使用 MSBuild.exe 在发布模式下构建 C# 解决方案
0
当我发布 Web 应用程序时,AfterPublish 脚本不运行
0
构建时 T4 转换的产品仅在下一个构建中使用
0
ASP.NET Core Application (.NET Framework) for Windows x64 only error in project.assets.json
0
新的 .csproj 格式 - 如何将整个目录指定为“链接文件"到子目录?
0
如何将条件编译符号(DefineConstants)传递给 msbuild
0
MSBuild 支持 Visual Studio 2017 RTM 中的 T4 模板
0
NuGet 包还原找不到包,没有源
0
使用 C# 6.0 功能运行 TFS 构建
0
