AngularJS Bootstrap详细介绍及实例代码
- 作者: 我想听她的演唱会
- 来源: 51数据库
- 2021-08-27
angularjs bootstrap
angularjs 的首选样式表是 twitter bootstrap, twitter bootstrap 是目前最受欢迎的前端框架。
查看 bootstrap教程。
bootstrap
你可以在你的 angularjs 应用中加入 twitter bootstrap,你可以在你的 <head>元素中添加如下代码:
<link rel="stylesheet" >
如果站点在国内,建议使用百度静态资源库的bootstrap,代码如下:
<link rel="stylesheet" >
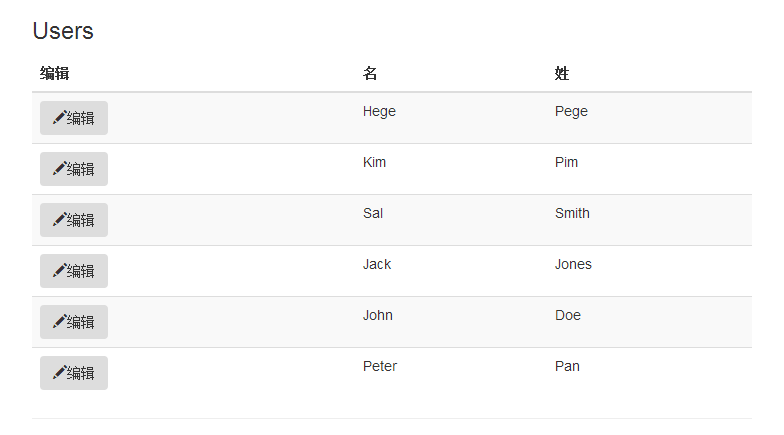
以下是一个完整的 html 实例, 使用了 angularjs 指令和 bootstrap 类。
html 代码
<!doctype html>
<html>
<head>
<meta charset="utf-8">
<link rel="stylesheet" >
<script src="http://www.51sjk.com/Upload/Articles/1/0/268/268338_20210708023634511.js"></script>
</head>
<body ng-app="myapp" ng-controller="userctrl">

<div class="container">

<h3>users</h3>

<table class="table table-striped">
 <thead>
 <tr>
  <th>编辑</th>
  <th>名</th>
  <th>姓</th>
 </tr>
 </thead>
 <tbody>
 <tr ng-repeat="user in users">
  <td>
  <button class="btn" ng-click="edituser(user.id)">
   <span class="glyphicon glyphicon-pencil"></span>编辑
  </button>
  </td>
  <td>{{ user.fname }}</td>
  <td>{{ user.lname }}</td>
 </tr>
 </tbody>
</table>

<hr>
<button class="btn btn-success" ng-click="edituser('new')">
<span class="glyphicon glyphicon-user"></span>创建新用户
</button>
<hr>

<h3 ng-show="edit">创建新用户:</h3>
<h3 ng-hide="edit">编辑用户:</h3>

<form class="form-horizontal">
 <div class="form-group">
 <label class="col-sm-2 control-label">名:</label>
 <div class="col-sm-10">
 <input type="text" ng-model="fname" ng-disabled="!edit" placeholder="名">
 </div>
 </div>
 <div class="form-group">
 <label class="col-sm-2 control-label">姓:</label>
 <div class="col-sm-10">
 <input type="text" ng-model="lname" ng-disabled="!edit" placeholder="姓">
 </div>
 </div>
 <div class="form-group">
 <label class="col-sm-2 control-label">密码:</label>
 <div class="col-sm-10">
 <input type="password" ng-model="passw1" placeholder="密码">
 </div>
 </div>
 <div class="form-group">
 <label class="col-sm-2 control-label">重复密码:</label>
 <div class="col-sm-10">
 <input type="password" ng-model="passw2" placeholder="重复密码">
 </div>
 </div>
</form>

<hr>
<button class="btn btn-success" ng-disabled="error || incomplete">
<span class="glyphicon glyphicon-save"></span>修改
</button>

</div>

<script src="myusers.js"></script>

</body>
</html>
运行结果:
指令解析
| angularjs 指令 | 描述 |
|---|---|
| <html ng-app | 为 <html> 元素定义一个应用(未命名) |
| <body ng-controller | 为 <body> 元素定义一个控制器 |
| <tr ng-repeat | 循环 users 对象数组,每个 user 对象放在 <tr> 元素中。 |
| <button ng-click | 当点击 <button> 元素时调用函数 edituser() |
| <h3 ng-show | 如果 edit = true 显示 <h3> 元素 |
| <h3 ng-hide | 如果 edit = true 隐藏 <h3> 元素 |
| <input ng-model | 为应用程序绑定 <input> 元素 |
| <button ng-disabled | 如果发生错误或者 ncomplete = true 禁用 <button> 元素 |
bootstrap 类解析
| 元素 | bootstrap 类 | 定义 |
|---|---|---|
| <div> | container | 内容容器 |
| <table> | table | 表格 |
| <table> | table-striped | 带条纹背景的表格 |
| <button> | btn | 按钮 |
| <button> | btn-success | 成功按钮 |
| <span> | glyphicon | 字形图标 |
| <span> | glyphicon-pencil | 铅笔图标 |
| <span> | glyphicon-user | 用户图标 |
| <span> | glyphicon-save | 保存图标 |
| <form> | form-horizontal | 水平表格 |
| <div> | form-group | 表单组 |
| <label> | control-label | 控制器标签 |
| <label> | col-sm-2 | 跨越 2 列 |
| <div> | col-sm-10 | 跨越 10 列 |
javascript 代码
myusers.js
angular.module('myapp', []).controller('userctrl', function($scope) {
$scope.fname = '';
$scope.lname = '';
$scope.passw1 = '';
$scope.passw2 = '';
$scope.users = [
{id:1, fname:'hege', lname:"pege" },
{id:2, fname:'kim', lname:"pim" },
{id:3, fname:'sal', lname:"smith" },
{id:4, fname:'jack', lname:"jones" },
{id:5, fname:'john', lname:"doe" },
{id:6, fname:'peter',lname:"pan" }
];
$scope.edit = true;
$scope.error = false;
$scope.incomplete = false;

$scope.edituser = function(id) {
 if (id == 'new') {
 $scope.edit = true;
 $scope.incomplete = true;
 $scope.fname = '';
 $scope.lname = '';
 } else {
 $scope.edit = false;
 $scope.fname = $scope.users[id-1].fname;
 $scope.lname = $scope.users[id-1].lname;
 }
};

$scope.$watch('passw1',function() {$scope.test();});
$scope.$watch('passw2',function() {$scope.test();});
$scope.$watch('fname', function() {$scope.test();});
$scope.$watch('lname', function() {$scope.test();});

$scope.test = function() {
 if ($scope.passw1 !== $scope.passw2) {
 $scope.error = true;
 } else {
 $scope.error = false;
 }
 $scope.incomplete = false;
 if ($scope.edit && (!$scope.fname.length ||
 !$scope.lname.length ||
 !$scope.passw1.length || !$scope.passw2.length)) {
  $scope.incomplete = true;
 }
};

});
javascript 代码解析
| scope 属性 | 用途 |
|---|---|
| $scope.fname | 模型变量 (用户名) |
| $scope.lname | 模型变量 (用户姓) |
| $scope.passw1 | 模型变量 (用户密码 1) |
| $scope.passw2 | 模型变量 (用户密码 2) |
| $scope.users | 模型变量 (用户的数组) |
| $scope.edit | 当用户点击创建用户时设置为true。 |
| $scope.error | 如果 passw1 不等于 passw2 设置为 true |
| $scope.incomplete | 如果每个字段都为空(length = 0)设置为 true |
| $scope.edituser | 设置模型变量 |
| $scope.watch | 监控模型变量 |
| $scope.test | 验证模型变量的错误和完整性 |
以上就是对angularjs bootstrap 资料的整理,后续继续补充,希望能帮助编程angularjs的同学。
推荐阅读
热点文章

Angular中响应式表单的三种更新值方法详析
7
Angularjs实现下拉框联动的示例代码
7
详解AngularJS跨页面传值(ui-router)
2
详解AngularJS1.x学习directive 中‘& ’‘=’ ‘@’符号的区别使用
3
angular2路由切换改变页面title的示例代码
4
Angular2 组件间通过@Input @Output通讯示例
5
Angularjs中ng-repeat的简单实例
3
AngularJS 中ui-view传参的实例详解
4
浅谈Angular路由守卫
4
详解基于Angular4+ server render(服务端渲染)开发教程
4
