详解如何在Angular中快速定位DOM元素
- 作者: 浮生半日闲人
- 来源: 51数据库
- 2021-07-31
在使用angular2+中,经常会想快速的去选择dom上的某个元素,如果是刚上手angular,有可能直接就使用原生dom操作或者导入jquery再进行dom操作,既然都使用了angular了,有没有更好的方法呢?答案是肯定的。
通过elementref
先上代码:
import {component, elementref, oninit} from '@angular/core';
@component({
 selector: 'app-root',
 templateurl: './app.component.html',
 styleurls: ['./app.component.css']
})
export class appcomponent implements oninit{
 color:string;
 title = 'button !';
 constructor(private el:elementref){}
 setheight(){
  this.el.nativeelement.queryselector('.btn1').style.height = '300px';
 }
 ngoninit(){
  this.setheight();
 }
}
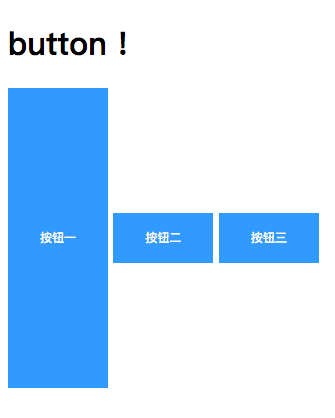
<h1>
 {{title}}
</h1>
<div>
<button myhighlight class="btn btn1">按钮一</button>
<button myhighlight class="btn">按钮二</button>
<button myhighlight class="btn">按钮三</button>
</div>
效果是这样:
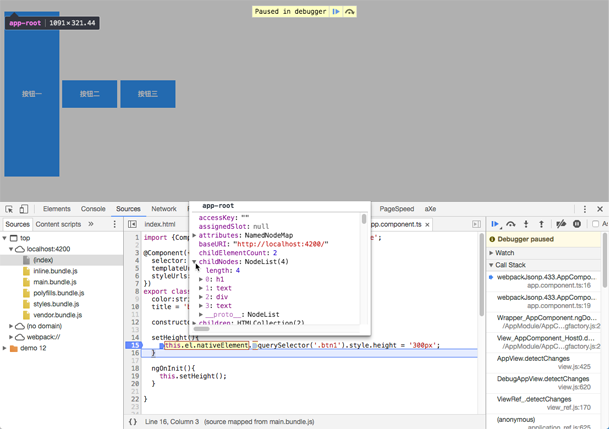
上述代码中的nativeelement其实包含的是组件中所有的dom元素,如下图所示:
通过调用queryselectorapi就能获取页面元素,需要注意的是queryselector只返回第一个元素,当你需要选择多个元素的时候可以使用queryselectorall。
通过@viewchild
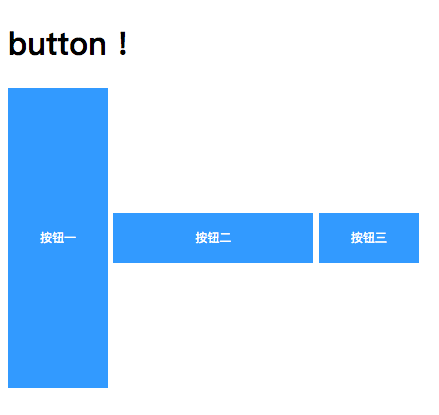
<h1>
 {{title}}
</h1>
<div>
<button myhighlight class="btn btn1">按钮一</button>
<button myhighlight class="btn" #btn>按钮二</button> <!--增加一个变量-->
<button myhighlight class="btn">按钮三</button>
</div>
import {component, elementref, oninit, viewchild} from '@angular/core';
@component({
 selector: 'app-root',
 templateurl: './app.component.html',
 styleurls: ['./app.component.css']
})
export class appcomponent implements oninit{
 @viewchild('btn') btn:elementref;//通过@viewchild获取元素
 color:string;
 title = 'button !';
 constructor(private el:elementref){}
 setheight(){
  this.el.nativeelement.queryselector('.btn1').style.height = '300px';
 }
 setwidth(){
  this.btn.nativeelement.style.width = '200px';//定义宽度
 }
 ngoninit(){
  this.setheight();
  this.setwidth();
 }
}
效果如下:
如果多个html元素都定义了相同的变量,使用@viewchild时只能选择到第一个元素。
更好的方法是配合renderer2对象提供的api去实现同样的效果,这样减少应用层与渲染层之间强耦合关系:
import {component, elementref, oninit, renderer2, viewchild} from '@angular/core';
@component({
 selector: 'app-root',
 templateurl: './app.component.html',
 styleurls: ['./app.component.css']
})
export class appcomponent implements oninit{
 @viewchild('btn') btn:elementref;
 color:string;
 title = 'button !';
  //初始化renderer2
 constructor(private el:elementref,private renderer2: renderer2){}
 setheight(){
  this.el.nativeelement.queryselector('.btn1').style.height = '300px';
 }
 setwidth(){
  // this.btn.nativeelement.style.width = '200px';

  //使用renderer2的setstyle方法设置宽度
  this.renderer2.setstyle(this.btn.nativeelement,'width','200px')
 }
 ngoninit(){
  this.setheight();
  this.setwidth();
 }
}
参考文章中都提到了@viewchild配合renderer选择元素,但是在angular4中renderer已经废弃掉了,变成了renderer2。
renderer2api中还有其他的一些方法可以用来进行一些dom操作:
class renderer2 {
 data : {[key: string]: any}
 destroy() : void
 createelement(name: string, namespace?: string) : any
 createcomment(value: string) : any
 createtext(value: string) : any
 destroynode : (node: any) => void |
 appendchild(parent: any, newchild: any) : void
 insertbefore(parent: any, newchild: any, refchild: any) : void
 removechild(parent: any, oldchild: any) : void
 selectrootelement(selectorornode: string|any) : any
 parentnode(node: any) : any
 nextsibling(node: any) : any
 setattribute(el: any, name: string, value: string, namespace?: string) : void
 removeattribute(el: any, name: string, namespace?: string) : void
 addclass(el: any, name: string) : void
 removeclass(el: any, name: string) : void
 setstyle(el: any, style: string, value: any, flags?: rendererstyleflags2) : void
 removestyle(el: any, style: string, flags?: rendererstyleflags2) : void
 setproperty(el: any, name: string, value: any) : void
 setvalue(node: any, value: string) : void
 listen(target: 'window'|'document'|'body'|any, eventname: string, callback: (event: any) => boolean | void) : () => void
}
以上就是本文的全部内容,希望对大家的学习有所帮助,也希望大家多多支持。
推荐阅读
热点文章

Angular中响应式表单的三种更新值方法详析
7
Angularjs实现下拉框联动的示例代码
7
详解AngularJS跨页面传值(ui-router)
2
详解AngularJS1.x学习directive 中‘& ’‘=’ ‘@’符号的区别使用
3
angular2路由切换改变页面title的示例代码
4
Angular2 组件间通过@Input @Output通讯示例
5
Angularjs中ng-repeat的简单实例
3
AngularJS 中ui-view传参的实例详解
4
浅谈Angular路由守卫
4
详解基于Angular4+ server render(服务端渲染)开发教程
4
