线性布局
- 作者: 硕大的菊花向阳开
- 来源: 51数据库
- 2021-09-03
一,界面与布局概述
(一)界面
应用界面包含用户可查看并与之交互的所有内容。安卓提供丰富多样的预置 UI 组件,例如结构化布局对象和 UI 控件,您可以利用这些组件为您的应用构建图形界面。安卓还提供其他界面模块,用于构建特殊界面,例如对话框、通知和菜单。
(二)
布局可定义应用中的界面结构(例如 Activity 的界面结构)。布局中的所有元素均使用 View 和 ViewGroup 对象的层次结构进行构建。
1.Container
UI容器指ViewGroup,也是View的子类,而ViewGroup有几个布局子类:LinearLayout、RelativeLayout、AbsoluteLayout、TableLayout、GridLayout,ConstraintLayout。
2.UI控件 (Control)
UI控件指Widget(微件),不能再包含其它元素的控件,例如标签(TextView)、文本框(EditText)、按钮(Button)、 活动栏(Action Bar)、对话框(Dialogs)、状态栏(Status)、通知(Notifications)。
在运行时实例化布局元素:应用可通过编程创建 View 对象和 ViewGroup 对象(并操纵其属性)。如:
二,线性布局
在这种布局中,所有的子元素都是按照垂直或水平的顺序排列在界面上。如果是垂直排列,每个子元素占一行,如果是水平排列,则每个子元素占一列。线性布局可以支持布局样式嵌套实现复杂的布局样式
(一)常见属性
-
layout_width:布局宽度(match_parent,wrap_conent)
-
layout_height:布局高度(match_parent,wrap_conent)
-
orietation:方向(vertical,horizontal) gravity:对齐方式(left, right, center,
top, bottom…) -
background:背景(颜色、图片、选择器) weight:比重(用于瓜分手机屏幕)
-
padding:内边距 (paddingLeft, paddingRight, paddingTop, paddingBottom)
-
margin:外边距 (marginLeft, marginRight, marginTop, marginBottom )
三,案例演示
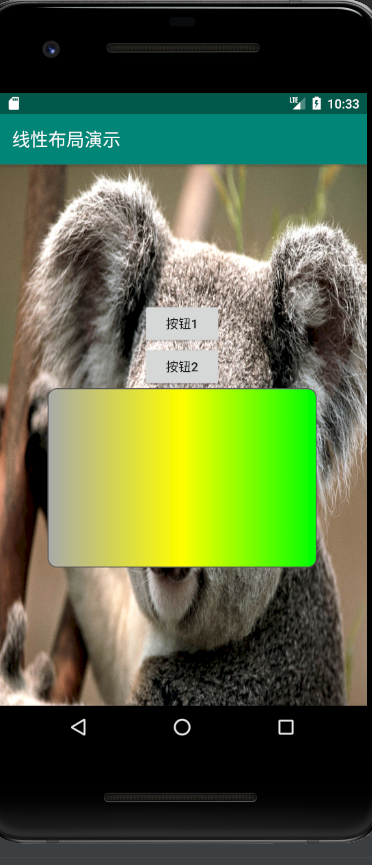
1.创建安卓应用【LinearLayoutDemo】
2.主布局资源文件activity_main.xml
- 将约束布局改为线性布局
- 添加两个按钮
<Button
        android:layout_width="wrap_content"
        android:layout_height="wrap_content"
        android:text="按钮1"/>
    <Button
        android:layout_width="wrap_content"
        android:layout_height="wrap_content"
        android:text="按钮2"/>
- 设置线性布局的方向
- 设置内边距
- 设置线性布局的对齐方式
- 设置背景图片
- 在drawable目录里创建自定义边框配置文件customer_border.xml
<?xml version="1.0" encoding="utf-8"?>
<shape xmlns:android="http://schemas.android.com/apk/res/android"
    android:shape="rectangle">

    <corners android:radius="10dp" />
    <solid android:color="#04be02" />
    <stroke
        android:width="1dp"
        android:color="#555555" />
</shape>
- 在``第二个按钮下添加线性布局
<LinearLayout
        android:layout_width="300dp"
        android:layout_height="200dp"
        android:background="@drawable/custom_border">
- 设置过渡色效果
- 效果如下:
案例演示 —— 线性布局嵌套
1.创建安卓应用【NestedLinearLayout】
2. 将小图片拷贝到res/drawable目录
3.布局资源文件activity_main.xml
- 将约束布局改成线性布局,设置方向属性
- 添加三个线性布局
<LinearLayout
        android:layout_width="match_parent"
        android:layout_height="wrap_content"
        android:layout_weight="1"
        android:background="#ffff00"
        android:gravity="center"
        android:orientation="horizontal">
        <ImageView
            android:layout_width="45dp"
            android:layout_height="45dp"
            android:src="@drawable/ic_launcher_foreground"/>

        <ImageView
            android:layout_width="45dp"
            android:layout_height="45dp"
            android:src="@drawable/ic_launcher_background"/>
        <ImageView
            android:layout_width="45dp"
            android:layout_height="45dp"
            android:src="@drawable/ic_launcher_foreground"/>

    </LinearLayout>
    <LinearLayout
        android:layout_width="match_parent"
        android:layout_height="0dp"
        android:layout_weight="2"
        android:background="#00ff00"
        android:gravity="center"
        android:orientation="vertical">
        <LinearLayout
            android:layout_width="match_parent"
            android:layout_height="wrap_content"
            android:gravity="center">
            <Button
                android:layout_width="wrap_content"
                android:layout_height="wrap_content"
                android:text="按钮1"/>
            <Button
                android:layout_width="wrap_content"
                android:layout_height="wrap_content"
                android:text="按钮2"/>
            <Button
                android:layout_width="wrap_content"
                android:layout_height="wrap_content"
                android:text="按钮3"/>


        </LinearLayout>
    </LinearLayout>
    <LinearLayout
        android:layout_width="match_parent"
        android:layout_height="0dp"
        android:layout_weight="3"
        android:background="#0000ff"
        android:orientation="horizontal">

    </LinearLayout>
-
运行程序,查看结果(三个子布局按照1:2:3垂直瓜分手机屏幕)
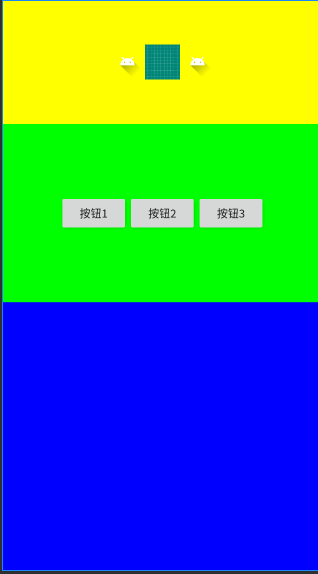
-
在第一个布局里添加三个图像控件
本来三个子布局按照1:2:3比例垂直瓜分手机屏幕,但是在第二个子布局里添加子控件之后,瓜分比例就发生变化了,第二个子布局瓜分比例超过了第三个 -
为了保持原来的瓜分比例将三个子布局的layout_height属性值统统设置为0dp